Author: Jeffrey Toorongian

Importing Content in a Canvas Course

When preparing for a new semester of teaching one common job on your list is to import instructional materials from a previous course. Canvas provides a robust tool for this job with with options to customize which content to import. Read on as we review the options and some important considerations when importing content to a Canvas course.

Import Course Content

Import Course Content option from course settings sidebar

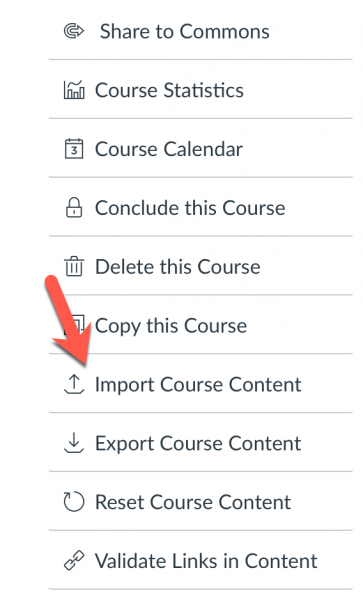
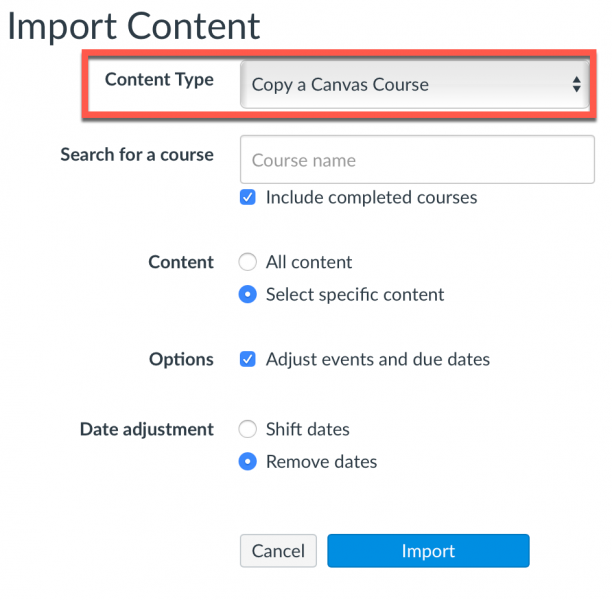
From the course Settings you choose the “Import Course Content” option to begin importing content from another Canvas course that you have instructor access in. Choosing the option “Copy a Canvas Course” for a content type will let you search for the course you want to import from. Courses will be listed alphabetically by most recent term. Once your source course is selected you have the option to simply import all content OR select specific content.

Import Content Options

How much content do you need?

Be thoughtful here. If you really only need some assignments and files from a previous course, choosing specific content can be a better option. There are many Canvas courses out there with lots of unused legacy content that just creates clutter and confusion for both the instructor and their students. So just import the content you really need for the new semester. You can always come back and import other items you may have missed.

Select Content Dialog

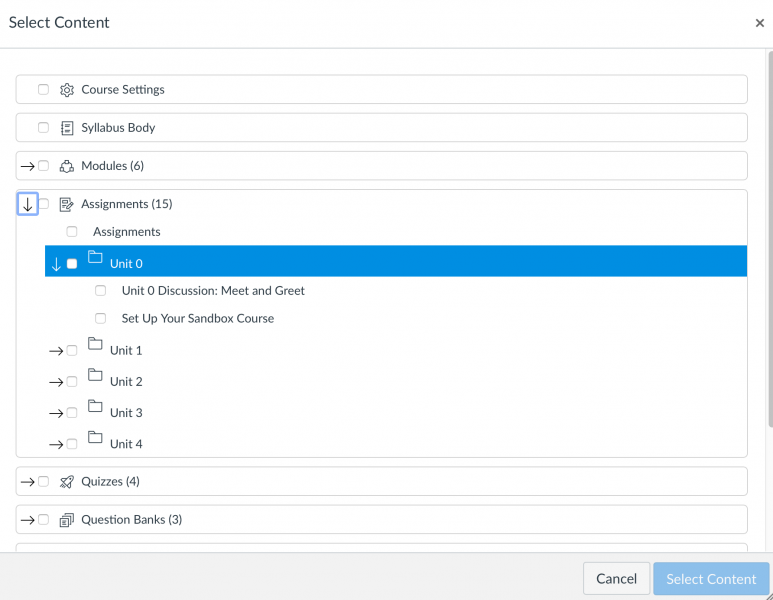
Canvas makes it pretty easy to choose specific content. Once you choose the “Select Specific Content” option from the Import Content menu you click the blue Import button. This cues up the import job in Canvas and provides you a Select Content button. When you click this, Canvas will display all content in the course you are importing from, sorted by type (modules, assignments, quizzes, etc.). You can expand the content item menu and check the boxes for just the items you need. Once you identify all content needed click the Select Content button to begin the import process. If you forget and item or two, no problem. Just start a new import job using the same process to retrieve any additional content you need.

Adjusting assignment dates

During the import process Canvas provides the option to retain assignment and events dates for the content you are importing. In most cases you will not want to use the old dates. Canvas lets you adjust dates by checking the options box and then either shifting dates for the imported content or removing dates entirely. Removing dates is often a good choice since it removes the possibility of you using an assignment with old dates and possibly creating an access problem for your students. All content comes into the new course clean and you can add current term due dates and availability dates when you are ready. The adjustment date feature works for assignments, announcements, quizzes, modules and files.

A powerful feature when used carefully

The course import tool can save instructors lots of time during course setup. The ability to use the custom features to target specific content for import and the ability to shift or remove dates can mean less time spent managing legacy content in your next course and more time available for creating new content and teaching.

Resource


Need Help?

Contact the elearning support team in the Jackson Center for Teaching and Learning if you have questions about Canvas, Huskycast, Zoom or other educational technology tools.

elearning@mtu.edu | 487-3000

Grade Submission Options

Grades

As we near the finish line of a challenging spring semester it’s a good time to review the options instructors have for submitting their final course grades. Read on to learn more about using the Canvas gradebook or Banweb to accomplish this.

Submit Grades from Canvas Gradebook

If you keep your Canvas gradebook accurate (with no muted or ungraded assignments and a correct grading scheme in place) you can choose to have Banner extract grades directly. The grading scheme validates Michigan Tech letter grades so they can be used in the Canvas gradebook. The Total column of the Canvas gradebook automatically calculates grades based on all published assignments in the course (including any weighting established with individual assignment groups). This column can be used for final grade submission, but this is a calculated column and cannot be manually adjusted.

To provide flexibility, all Canvas courses are created with an unpublished assignment called Final (course grade) which allows instructors to enter letter grades directly in Canvas. Once grades are entered you can choose to extract final grades from this assignment column by selecting it when using the Canvas grade submission tool. Details on submitting grades from Canvas are available in this knowledge base article.

Submit Grades from Banweb

You can also submit grades directly in Banweb via the Faculty/Advisor tab. This options allows you to manually enter grades and works well for smaller course sections (less than 30). When you choose the grade submission option in Banweb you are directed to choose the course and then the final grade option to begin entering grades. Any “I” or “F” grades that you enter will require you to provide additional information about student attendance in the course. A Banweb submission knowledge base article details this option.

Regardless of the grade submission option you choose it’s important to make sure that the grade information in your Canvas gradebook is up to date and accurate so your students know their status as the term progresses.


Resources

Need Help?

Contact the elearning support team in the Jackson Center for Teaching and Learning if you have questions about Canvas, Huskycast, Zoom or other educational technology tools.

elearning@mtu.edu | 487-3000

The Ally Course Accessibility Report

Ally Course Accessibility Dashboard

Ally is a course accessibility tool that works within Canvas. It automatically scans Canvas course content and provides accessibility scores and feedback to instructors about specific accessibility problems, why they are important, and how to remove them. One valuable component of Ally is the course accessibility report. Let’s review this feature.

Overview

You access the Ally course accessibility report from the Canvas course navigation item on the left. The report has two main areas: an overview and a content detail page. The overview provides a comprehensive tally of all course content types including images, content pages, announcements, assignments, discussions, documents, etc. It also sorts course content into a group of easiest to fix issues, and a group with the lowest accessibility scores. These sorted groups help instructors prioritize items that can have the most impact for their students.

Content

The content view lists every item Ally has identified in your course and assigns it an accessibility score. These scores are reported as a percentage with an associated color-coded gauge.

Ally scoring gauges
  • Low (0-33%)- severe accessibility issues exist
  • Medium (34-66%)- somewhat accessible but needs improvement
  • High (67-99%)- file is accessible, but improvements are possible
  • Perfect- no accessibility issues identified by Ally, but further improvement may be possible.

When you click on a gauge Ally opens a preview of the content item (when available) and provides a prioritized listing of all accessibility issues. Ally also provides guidance about what the issues mean and why they are important. In some cases corrections can be made directly within the Ally interface (such as adding alternative text descriptions for images), while in other cases you would need to correct problems in the source document directly. As you make improvements to your content Ally updates the accessibility score immediately.

It’s A Process

Improving access to your instructional materials takes time. Ally can help you prioritize your limited time to make the most impact on your course. While it’s easy to feel overwhelmed by the volume of problems Ally identifies, and you may not know where to begin, it’s important to just get started and make improvements. Over time this can have a big impact on your Ally course accessibility score, and, more importantly, remove digital barriers within your instructional materials so more students can use them effectively.

Check back for future posts about other valuable features of Ally in your Canvas courses.


Resources

Need Help?

Contact the elearning support team in the Jackson Center for Teaching and Learning if you have questions about Canvas, Huskycast, Zoom or other educational technology tools.

elearning@mtu.edu | 487-3000

Immersive Reader: Support tools for learners in Canvas

Microsoft Immersive Reader interfaace

Canvas recently added support for Microsoft’s Immersive Reader tool-set within content pages. It provides features similar to other literacy software like Read & Write from Texthelp (also available to all MTU students, staff, and faculty). When viewing a Canvas content page learners can click the Immersive Reader button in the upper right corner of the page to access the tools.

Immersive Reader button in Canvas content page

Text to Speech

Immersive Reader features a read out loud feature that allows learners to listen to the text read back to them while the words on the screen are highlighted. Options to select a female or male voice and adjust reading speed are available. Text to speech assistive technology supports improved reading comprehension. When combined with the text translation feature learners can also listen to page content read to them in a different language.

Customized text display

Learners have access to many tools in Immersive Reader to customize the display of text on the Canvas content page, including:

  • Text size
  • Text spacing
  • Display font
  • Color theme
  • Text formatting

These text features support learners with dyslexia or other conditions that make reading comprehension more difficult. For example, increasing the text spacing can reduce visual crowding on a content page which can help increase reading speed with fewer reading errors. Increasing the text size also reduces line length which can also help improve reading speed. Adjusting the color theme of the page can help some readers who experience visual discomfort or symptoms of eye fatigue while reading the default text display on a page. There is a choice of display fonts including a standard sans serif option (Calibri) or a screen-optimized serif font called Sitka that can improve legibility and readability. A final font choice, Comic Sans, is targeted at early readers who are still developing their skills with letter recognition. The informal character of the font mimics the handwritten text that young learners practice often during primary school.

Grammar Options

Grammar Options panel in Immersive Reader

The grammar tools in Immersive Reader allow learners to see a visual indicator of the syllabic components of words and identify the parts of speech (nouns, verbs, adjectives, adverbs) via color coding and/or labels. These features support reading comprehension in both child and adult readers as well as non-native English learners.

Sample text in Immersive Reader showing syllable indicators and parts of speech (nouns, verbs, adjectives, adverbs).

Reading Preferences

The line focus tool in Immersive reader can help learners with attention deficit disabilities by focusing on one, three or five line segments of text. They can manually scroll through the page content or listen via the text to speech feature while viewing in line focus mode. Finally, a picture dictionary option is available for some words. When learners click on supported words a representative image is displayed next to the selected word.

Improved access

Tools like Immersive Reader support the Universal Design for Learning framework which encourages multiple ways for learners to engage with instruction materials (multiple means of representation). Students may also feel more empowered to engage with their instructional materials through additional modalities that can support comprehension and build confidence.

Resources


Need Help?

Contact the elearning support team in the Jackson Center for Teaching and Learning if you have questions about Canvas, Huskycast, Zoom or other educational technology tools.

elearning@mtu.edu | 487-3000

Canvas Quizzes, Extended Time, and the Moderate tool

Moderate Quiz link in published Canvas Quiz

If you use Canvas quizzes frequently you’ve likely had the need to provide extra time for students with formal accommodations. This need has escalated during the current remote instruction environment as Canvas quiz usage has increased. While there is more than one way to accomplish this, using the Canvas quiz moderate feature is the best way to easily provide extra time for specific students.

Moderate this Quiz

Once you publish your Canvas classic quiz a “Moderate this Quiz” feature appears in the quiz sidebar to the right. The moderate quiz page supports several important functions:

  • View progress of student submissions
  • View number of quiz attempts taken (where appropriate)
  • Provide extra quiz attempts
  • Provide extra time (for timed quizzes)
  • Manually unlock quizzes for a specific student

To provide extra time for a student find their name from the list of all enrolled students then click on the edit icon (pencil icon) at the far right. A student extensions window will appear with options to provide extra time. The amount of time you enter there will add on to the standard time allowed for all students. Don’t forget to click Save to apply the extension changes.

Student extensions window in Canvas quiz moderate feature.
Student Extensions window in Quiz Moderate tool

If you have more than one student that needs extra time you can select multiple students (click boxes next to their names) first and then add extra time to all students as a group.

Moderate Quiz selection screen
Select multiple student and apply extensions

If you’re in a situation where you need provide additional time while a student is taking the quiz you can do that too. The moderate page shows the running time for all active students in a quiz. You can click on the clock icon for a student and add extra time to their current attempt. Review the resource guides linked below for additional details on this process.

Make sure you also assign due dates and availability dates to your quizzes. The due date is critical to remind students when the quiz must be completed. Availability dates are the open and close doors when a quiz is available. These dates can provide your students with some flexibility for when they take the exam.

There is a lot of power under the moderate page hood. If you are a regular user of Canvas quizzes you should take some time to familiarize yourself with the available features so you can react quickly when you run into an unexpected situation.

Resources


Need Help?

Contact the elearning support team in the Jackson Center for Teaching and Learning if you have questions about Canvas, Huskycast, Zoom or other educational technology tools.

elearning@mtu.edu | 487-3000

Support resources for EdTech tools

EdTech tools: Canvas, Panopto, Zoom, iClicker, Respondus, Turnitin, Gradescope

Pandemic-induced remote instruction has required us to spend more time online supporting our students. Many people are using EdTech tools now more than ever before in their teaching careers. At Michigan Tech the “Big Three” EdTech tools are Canvas, Panopto-Huskycast, and Zoom. Using these tool effectively is critical for a successful teaching and learning experience for you and your students. Have you also found yourself “pushing” these tools to the next level? To do more with the tools you need to learn more about their capabilities. The elearning team helps instructors with that every day. But we don’t do it alone. We rely of the extensive support and training resources available from our vendors. To help you find “how-to” information more quickly we have gathered the links to the training resources for some of the most common EdTech tools you are likely using often.

EdTech Tool Support Resources
Canvas Instructor Guides
Instructor Video Guides
Student Guides
Panopto-Huskycast Guides
Video tutorials
Zoom Help Center
User Guide FAQ
Top 20 Resources
Respondus (online testing tools) Training resources
Webinars
turnitin/gradescope turnitin Feedback Studio
gradescope getting started guides
gradescope remote assessment resources
iClicker Cloud Instructor guides
Quickstart guide for remote instruction

Need Help?

Contact the elearning support team in the Jackson Center for Teaching and Learning if you have questions about Canvas, Huskycast, Zoom or other educational technology tools.

elearning@mtu.edu | 487-3000

Using Math in your Canvas Course Content

Do you use math content in your Canvas course pages, assignments, quizzes, etc.? Do you struggle with how to insert math expressions properly? Do you insert images of math expressions (inherently inaccessible)?

Using math in your Canvas instructional materials can be challenging. Making sure that content is digitally accessible to all learners is more important now that ever with the dramatic shift to remote instruction during the pandemic. Let’s review some options and best practices for creating accessible math expressions in your Canvas instructional content.

Insert Options in Canvas

The Canvas Rich Content Editor (RCE), available throughout Canvas (content pages, discussions, assignments and quizzes) offers some powerful tools for inserting math.

Equation Editor

Canvas equation Editor
Canvas equation editor (basic view)

The Canvas equation editor allows you to build math expressions from scratch using the available toolbars in the basic view. This option is similar to equation editors you may have used in Word, for example. When you click on the advanced view option you can enter LaTeX code. LaTeX is a markup language commonly used for typesetting technical content (like math expressions) in documents. If you are fluent with LaTeX, the advanced equation editor can be an efficient method of placing math in your course content.

MathJax

Recently, Canvas announced a plan for extended support and enhanced digital accessibility of LaTex-based math expressions. Once implemented by Canvas, properly formatted LaTeX will be able to be added directly in any text field in Canvas, including in page and assignment titles and calendar entries. By including the required formatting that specifies inline or block formatting of the math, Canvas will work with the browser to display the math properly using a JavaScript display technology called MathJax. You won’t need to worry about the MathJax magic though, you just need to enter accurate LaTeX code and format it for the desired display type and it should just work. The great advantage here is that math expressions entered this way are accessible to people using an assistive technology called a screen reader. This feature was originally released on February 20, but there have been a few glitches and Canvas has pulled it back for now. Hopefully it will be available again soon.

2021-02-23_14-58-34 (1).gif
Inserting math expressions with LaTeX in Canvas rich content editor

EquatIO

Another powerful tool for creating digital math is EquatIO, available from the apps menu in the Canvas RCE. When not in Canvas you can also download EquatIO for Mac or Windows and run it on your computer, or as an extension in the Chrome browser (register it with your MTU email address to get access to premium features).

EquatIO App in the Canvas RCE toolbar

EquatIO offers several inputs methods for inserting math in Canvas, including the type-as-you-go equation editor, LaTeX, and handwritten or spoken math expressions.

EquatIO insert menu in Canvas
EquatIO editor (showing LaTeX input method) in Canvas RCE

The equation editor features prediction to help speed up the input workflow. So when you type “sq” for example, EquatIO offers options like “squared” or “square root”. You can also enter LaTeX math and EquatIO will insert the expression as an image file that includes accurate alternative text to support screen reader users. If you have a touch-based device you can write out math by hand and EquatIO will similarly convert it to an image of the expression. You can also speak math using your microphone and EquatIO will convert to digital math. Both the handwritten and spoken input options can work quite well as long as you can write reasonably well or speak clearly without too much background noise.

EquatIO Works Great for Students Too

Students can also use EquatIO to input math expressions anywhere in Canvas that they have access to the RCE, such as in a discussion post, or a text-based response in a quiz. EquatIO also supports students who may struggle with interpreting math expressions, a disorder called dyscalculia. The standalone EquatIO application (available to all MTU students, staff, faculty) includes an additional tool called the screenshot reader. This powerful feature allows students (or anyone else) to select a math expression on their computer screen. EquatIO then applies optical character recognition (OCR) and provides options to listen to the expression read back to them, or to read a text-based version of the expression to help with comprehension. Next time you need to add math to your Canvas content consider using one of these approaches to make your math digital and more accessible.

Resources


Need Help?

Contact the elearning support team in the Jackson Center for Teaching and Learning if you have questions about Canvas, Huskycast, Zoom or other educational technology tools.

elearning@mtu.edu | 487-3000

Respondus Live Proctoring; Is this the right tool for your class?

Lockdown Browser +Instructor Live Proctoring

Pandemic-induced remote instruction practices have brought new challenges for protecting the integrity of student assessments. If you can’t administer your exam in the classroom and can’t use the services of the Michigan Tech Testing Center (students not campus-based) there are other options.

Michigan Tech instructors have had access to Respondus LockDown Browser and Respondus Monitor to support online assessments for some time. Now a third option called Respondus Live Proctoring is available. To review, LockDown Browser is a dedicated browser designed to confine the testing environment to Canvas. A companion tool called Respondus Monitor builds on this by leveraging student webcams and video analytics to help deter cheating in non-proctored environments. Instructor Live Proctoring adds to the Respondus toolbox by working in conjunction with LockDown Browser and Zoom to allow instructors to proctor exams live (via a Zoom meeting) for small classes (Respondus recommends up to 25). Let’s take a closer look at this new option.

To use Respondus Live Proctoring instructors create a Canvas assessment using the Quiz tool and then enable Respondus LockDown Browser and Live Proctoring from the LockDown Browser dashboard available in the Canvas course navigation.

Respondus Lockdown Browser dashboard in Canvas
Respondus LockDown Browser Dashboard
Live Proctoring Settings
Respondus Live Proctoring Setting

To avoid test day complications make sure students have previously installed LockDown Browser on the computer they will be taking the exam on. At test time students join the Zoom meeting for last minute instructions, attendance, and a start code that will allow them to open the exam from LockDown Browser. Canvas Classic Quizzes (used by most MTU instructors currently) require students to first open LockDown Browser, log in to the Canvas course, and then open the quiz. Once the quiz is opened in LockDown Browser, students are confined to the quiz environment, but the Zoom meeting is still active in the background. This allows the instructor to proctor students via their webcams in the Zoom meeting.

Important Considerations

The CTL recently tested the Live Proctoring feature and offers the following observations and guidance.

Test, test, test

It’s important to test this workflow before an actual exam. Creating a simple Canvas test quiz with the Live Proctoring feature enabled will allow for this. Students will have an opportunity to install LockDown Browser and open the test quiz to confirm that their system is working properly. This also gives you a chance to experience what Live Proctoring “looks like” from a Zoom meeting. As noted earlier, Respondus recommends this feature for small class sizes (no more than 25).

Limited communication during quiz

Once the Canvas quiz is underway the instructor maintains full access to the Zoom meeting while students have NO ACCESS to the Zoom meeting. As long as students leave their webcam and microphone on before starting the quiz the instructor will still be able to see and hear them. This also means that other students can hear them as well. As the instructor, you get to decide how to manage any potential distraction that may arise. You could ask students to mute their microphone before they open the quiz in LockDown Browser. Or you could ask students to leave their microphone on, but complete the exam in a quiet space to avoid distractions. You could also mute individual student microphones from your Zoom controls if distractions arise during the quiz.

It is technically possible for instructors to make an announcement in the Zoom meeting during the quiz, but students would not see the instructor. One option might be to inform students in advance that you will ask for questions at a predetermined time so students know there will be an opportunity to ask a question at some point. All students would hear any discussion between any one student and the instructor.

Live Proctoring is different that Monitor

The Live Proctoring feature does not record students during the test and does not provide instructors with any alerts of suspicious activity during exam time. That’s the job of the instructor. Automated recording and alerts is only available in the automated Respondus Monitor proctoring solution.

Resources


Need Help?

Contact the elearning support team in the Jackson Center for Teaching and Learning if you have questions about Canvas, Huskycast, Zoom or other educational technology tools.

elearning@mtu.edu | 487-3000

Three Huskycast features you should know about

Huskycast

Huskycast is Michigan Tech’s branded Panopto video platform. In the years leading up to the pandemic we saw a steady increase in video usage, both in lecture capture recordings and in content uploaded to the system. With the dramatic shift to remote instruction over the last year video usage has exploded (not surprisingly). With more users than ever creating and/or viewing content in Huskycast let’s review three great features that you may not know about.

Panopto-Zoom Integration

Many instructors are using Zoom to provide a synchronous remote environment for their course meetings. The ability to record Zoom sessions is a great way to allow students to review the class sessions again, or to catch up on sessions they may have missed. With the use of a recurring Zoom cloud meeting instructors can automatically have their recordings transferred to a designated Huskycast course folder in Canvas. This can save you lots of time managing content between Zoom and Huskycast and all students enrolled in the associated Canvas course automatically have access to view the recordings. You don’t need to manually share links to the recordings either, since students can just click on the Huskycast course link and select the recording they wish to view. You can learn more about this integration and contact elearning with any questions. Don’t forget to enable the audio-transcript option in your Zoom recording so that a transcript file will transfer to Huskycast along with the Zoom recording.

Video Assignments

Looking to provide your students with an alternative mode for demonstrating competency of your course objectives (multiple means of action and expression)? Why not consider using video? Huskycast allows instructors to create video-based assignments that students can submit directly in Canvas. Students can use the available recording tools in Huskycast to create their video, use other video software, or just record on their phone. When they’re ready they can upload the video either directly in the Canvas video assignment, or into the Huskycast assignment folder in the course. By default student-submitted videos are viewable by only the instructor (and the submitting student), but you have the option to allow other students to view and comment on videos if desired. Some examples of effective video assignments:

  • Student introductions
  • Video-based discussion post
  • Multimedia-based final project presentation
  • Student teach-back session (students explain new concepts they recently learned)

Embedded Quizzes

A low-stakes knowledge check can be a good pedagogical tool for measuring student comprehension during instruction. In Huskycast you can add a quiz and ask one or more questions within your videos. This quiz allows learners to verify comprehension and can give them confidence to learn deeper. When building the quiz you can require correct answers before moving on, or just provide correct answers. You can even create Canvas assignments tied to a Huskycast quiz and have the points earner for correct responses be recorded in the Canvas grade book. Multiple choice, multiple answer, true/false, and fill in the blank questions types are available in Panopto-Huskycast quizzes.

Resources

Need Help?

Contact the elearning support team in the Jackson Center for Teaching and Learning if you have questions about Canvas, Huskycast, Zoom or other educational technology tools.

elearning@mtu.edu | 487-3000

Canvas content pages or PDF’s: Is there a better approach?

You probably have lots of instructional materials loaded into your Canvas courses. You can present information from custom web pages, called content pages. You can also upload files into Canvas (documents, presentations, etc.). Is one approach better than another? While there is no single correct answer for all situations, considering your students needs when determining how to provide course materials can be a good approach.

Content Pages

A content page in Canvas is actually an HTML web page created with the tools available in the Rich Content Editor (RCE). Although you can enter HTML code to create this page, most folks use the visual RCE tools for this process. Providing instruction from a content page has some advantages for your students:

  • Can be accessed from a desktop/laptop computer, or mobile device (via Canvas student app) without the need to download or open other software.
  • Page content is responsive (adapts to reader preferences and display/device limitations).
  • Well-designed content pages work seamlessly with assistive technology

The Canvas RCE has tools for inserting and styling text, adding images and videos, and linking to other course resources or external sites. You can insert tables and math expressions (manually created or via LaTeX). You can also build math expressions using a variety of input methods from the powerful EquatIO tool available from the Apps tool (plug icon) in the RCE. A built in accessibility checker is also available to check for some common errors, such as missing alternative text descriptions for images, missing table headers, and proper heading and list structure.

In many instances a well-structured Canvas content page can offer the best experience for your students, providing them the flexibility to access the content from various devices and without need for additional software.

PDF’s

Documents can be shared in many formats, but the most common (by far) is PDF. Documents usually originate in Word or Google format, or PowerPoint presentation files. Uploading these files to your Canvas course to share with students requires them to have the necessary software to open these formats. Students must also download the files and then open locally on their computer and may need access to a printer if they require a hard copy.

Providing documents in PDF format can eliminate some of the software restrictions. Students can download the free Adobe Reader (or use another PDF viewer available with their operating system) to access the PDF course materials. In most cases, the document will look exactly the same as when you designed it (assuming you have exported it properly). For the syllabus or other important course documents a printable PDF can be an valuable resource.

Document Structure

It’s very important that you use the correct workflow for exporting your documents. This usually means using the “export to PDF” or “save as PDF” options in your text editor to create your document. Never use the “Print to PDF” option! The resulting PDF will be an image based file that will have none of the underlying structural elements that are very important to students who use assistive technology, or for anyone who needs to modify the document for optimal viewing.

This underlying structure is equally important when sharing PDF’s from online journals or scanned from physical textbooks. Unfortunately many journals are still not providing fully accessible documents. Scanned documents are often inherently inaccessible (image-based) and very difficult to use by all learners. In both cases students can face serious digital barriers to access if they are using assistive technology. The Ally accessibility checker included in Canvas will scan all documents in your course and provide an accessibility score and guidance for how to make improvements, if needed.

A Van Pelt and Opie librarian can help you locate accessible course resources from journals and publications and the Jackson Center for Teaching and Learning is available to consult about best options for creating and sharing course materials with your students in Canvas.

Resources

Creating Accessible Documents
Creating Accessible Presentations


Need Help?

Contact the elearning support team in the Jackson Center for Teaching and Learning if you have questions about Canvas, Huskycast, Zoom or other educational technology tools.

elearning@mtu.edu | 487-3000