
Author: Jeff Toorongian

Canvas content pages or PDF’s: Is there a better approach?

You probably have lots of instructional materials loaded into your Canvas courses. You can present information from custom web pages, called content pages. You can also upload files into Canvas (documents, presentations, etc.). Is one approach better than another? While there is no single correct answer for all situations, considering your students needs when determining how to provide course materials can be a good approach.

Content Pages

A content page in Canvas is actually an HTML web page created with the tools available in the Rich Content Editor (RCE). Although you can enter HTML code to create this page, most folks use the visual RCE tools for this process. Providing instruction from a content page has some advantages for your students:

  • Can be accessed from a desktop/laptop computer, or mobile device (via Canvas student app) without the need to download or open other software.
  • Page content is responsive (adapts to reader preferences and display/device limitations).
  • Well-designed content pages work seamlessly with assistive technology

The Canvas RCE has tools for inserting and styling text, adding images and videos, and linking to other course resources or external sites. You can insert tables and math expressions (manually created or via LaTeX). You can also build math expressions using a variety of input methods from the powerful EquatIO tool available from the Apps tool (plug icon) in the RCE. A built in accessibility checker is also available to check for some common errors, such as missing alternative text descriptions for images, missing table headers, and proper heading and list structure.

In many instances a well-structured Canvas content page can offer the best experience for your students, providing them the flexibility to access the content from various devices and without need for additional software.

PDF’s

Documents can be shared in many formats, but the most common (by far) is PDF. Documents usually originate in Word or Google format, or PowerPoint presentation files. Uploading these files to your Canvas course to share with students requires them to have the necessary software to open these formats. Students must also download the files and then open locally on their computer and may need access to a printer if they require a hard copy.

Providing documents in PDF format can eliminate some of the software restrictions. Students can download the free Adobe Reader (or use another PDF viewer available with their operating system) to access the PDF course materials. In most cases, the document will look exactly the same as when you designed it (assuming you have exported it properly). For the syllabus or other important course documents a printable PDF can be an valuable resource.

Document Structure

It’s very important that you use the correct workflow for exporting your documents. This usually means using the “export to PDF” or “save as PDF” options in your text editor to create your document. Never use the “Print to PDF” option! The resulting PDF will be an image based file that will have none of the underlying structural elements that are very important to students who use assistive technology, or for anyone who needs to modify the document for optimal viewing.

This underlying structure is equally important when sharing PDF’s from online journals or scanned from physical textbooks. Unfortunately many journals are still not providing fully accessible documents. Scanned documents are often inherently inaccessible (image-based) and very difficult to use by all learners. In both cases students can face serious digital barriers to access if they are using assistive technology. The Ally accessibility checker included in Canvas will scan all documents in your course and provide an accessibility score and guidance for how to make improvements, if needed.

A Van Pelt and Opie librarian can help you locate accessible course resources from journals and publications and the Jackson Center for Teaching and Learning is available to consult about best options for creating and sharing course materials with your students in Canvas.

Resources

Creating Accessible Documents
Creating Accessible Presentations


A New Editor in Canvas

You’ve probably noticed that things look a little different in the Canvas Rich Content Editor (RCE) these days. The updated editor became available in all Michigan Tech Canvas courses at the beginning of the Spring 2021 semester. We’ve seen several support requests come into the CTL recently asking how to do things like insert course links, images, media, and documents in the new editor. Our knowledge base article provides a good overview of changes and Canvas offers many guides about specific functionality as well. Below I will outline a few common pain points we have been seeing since the change to the new RCE.

Links tool in Canvas Rich Content Editor

Links

In the new RCE there are separate tools for inserting content. These tools are grouped in a section of the toolbar and are also available from the Insert menu at the top of the RCE interface. The process to link to other course content has changed. When you select the Course Links option a sidebar will open allowing you to browse and select where you want to link in your course. You can also insert external links (and add descriptive link text) from this tool.

Image tool in Canvas Rich Content Editor

Images

The image tool lets you insert images via upload, or from your course files directory. With the upload option you can drag/drop or browse to a file on your computer. You can also link to a url from a photo hosting service. To support accessibility make sure to include alternative text to any images that convey important meaning, or click the available box to tag the image as decorative only. You can also insert files already present in your course files directory or from your Canvas user files (global files attached to your Canvas profile).

Media

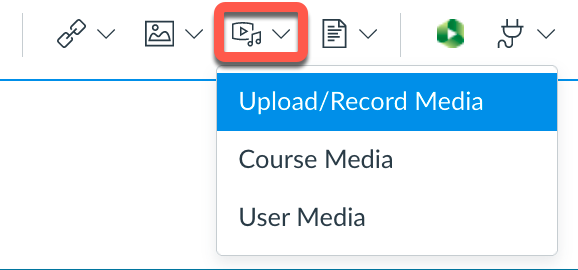
The upload/record media tool lets you insert media files (short audio/video clips) by dragging them into the upload box or browsing to a media file on your desktop. The record media option allows you to record media on the fly using your available camera and microphone devices. Existing media files in your course or Canvas account can also be inserted. Any video content that is stored in your course

Huskycast embed tool in Canvas Rich Content Editor

Huskycast folder can be inserted by selecting the green Huskycast icon. When you click this tool you can browse and select the video session in Huskycast that you want to insert. Remember Huskycast video content is not stored in your Canvas course files area so it does not count against your course file storage quota. We highly recommend that you store all video content in Huskycast and not in your Canvas course files area.

Document insert tool in Canvas Rich Content Editor

Documents

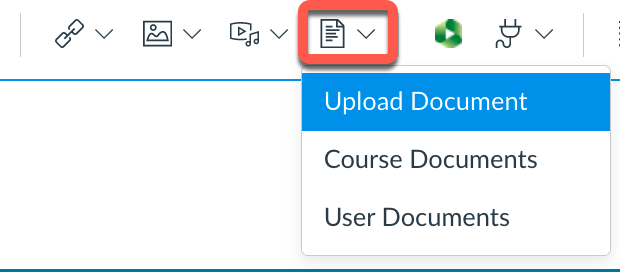
Insert links to existing documents in your course files or drag and drop new document files from your computer into the upload window.

Try it Out

Yes, there are some significant changes in the new Canvas RCE, but once you update your workflows you should benefit from the more robust editing features available. Let us know if we can help.

Resources

Canvas: Rich Content Editor Guides
MTU: New Rich Content Editor


Zoom Features to Support Student Access

If you have been teaching in the past year you have likely spent time (too much maybe?) using Zoom. Two important new features have been released for all Michigan Tech Zoom accounts over the last few months that help support access to your Zoom recordings for all your students. Most recently, live transcription was enabled just in time for Spring semester courses. Previously, an audio transcription feature was added that generates transcripts from completed Zoom recordings. Read on for more details.

Zoom toolbar with live transcript feature highlighted
Zoom live transcript button

Zoom Live Transcription

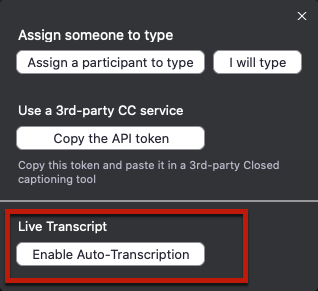
When conducting a Zoom meeting you now have the option to click the “Live Transcript” button in the Zoom toolbar to enable live auto-transcription in your meeting. Once complete all attendees will see the live auto-generated transcript appear at the bottom of the Zoom screen with options to adjust the size of the transcript text or turn the feature off. If enabled by the meeting host, the live transcript file can also be downloaded by attendees.

Zoom enable auto-transcription button for the live transcript feature
enable the live transcript feature

Zoom Audio Transcripts

In addition to the new live transcription feature, meeting hosts can also have Zoom auto-transcribe completed cloud recordings to obtain audio transcripts. This feature has been available for the past year. It’s great if you use Zoom to pre-record presentations, or when you don’t want to use the live transcript feature. Once you end your cloud recording meeting, Zoom begins the auto-transcribe process and adds the audio transcript file to the cloud recording list in your Zoom account. One added benefit of this feature is that the audio transcript will automatically transfer with the Zoom recording into a designated Huskycast course folder and be available to students from the closed caption (cc) button in the player. This transfer to Huskycast only works if you have requested the Panopto-Huskycast/Zoom integration and are using recurring cloud recordings.

Who Benefits from Transcripts and Captions?

Many people can benefit from having a transcript of class sessions available including the following scenarios:

  • Deaf or hard of hearing viewers
  • Viewers who know English as a second language
  • When content includes new and unfamiliar jargon
  • Consuming content in loud or very quiet environments where regular audio playback is not feasible
  • Can help with concentration for viewers with certain learning disabilities or attention deficits

Remember that automated transcription tools like those available in Zoom are not fully accurate and should not be considered fully compliant solutions for students with formal accommodations for closed captions or transcripts to support their learning needs.

Resources

Zoom Live Transcription Feature
Using Audio Transcription with Zoom Cloud Recordings
Using the Panopto-Huksycast/Zoom Integration