Month: May 2021

Share your presentation as a virtual background in Zoom

Do you typically use Powerpoint slides to present to your audience during a Zoom meeting? Do you know that Zoom now allows you to make the slide presentation more engaging by imposing you video directly onto your screenshare?!

This feature is available on any Zoom Desktop Client for Windows or Mac using a version 5.2.0 or higher. As I write this blog, our institution is on version 5.6.4, so if you are working from an on-domain computer you should have access to this feature. If you are working from a personal computer, you may want to check for updates to your Zoom client to be sure you are using the latest version available.

Sharing a presentation as the background

Once you have your Powerpoint slides created and have started your Zoom meeting, you will want to select the ‘Share Screen‘ button on your meeting controls. Select ‘Advanced‘ at the top of the screen and then you should see an option to ‘Select Slides as Virtual Background‘.

Advanced setting Options

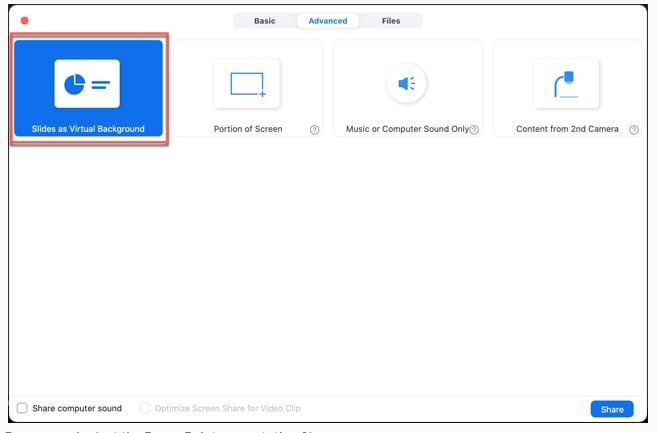
Now you can simply browse and open your Powerpoint Slide presentation file. If your video is ‘on’ by default in the Zoom meeting, your video will automatically be imposed on your screen share. You will see a toggle feature at the top of your meeting controls that will allow you to advance through your slides.

Recording the presentation

So, how will this look if you typically record your Zoom meetings? If you record the meeting locally and are on a Zoom client version 5.2.0 or higher, the video will be embedded on the slides in the recording. If you record to the cloud, the recording will capture the slides and video as a normal screen share recording.

Additional items to consider

  • Sounds, transitions and animations within slides are not supported.
  • If a participant joining the Zoom meeting is on a version below 5.2.0, the presentation will appear as a normal screen share of slides with the presenter video separate.
  • For full details about this Zoom feature, please reference this Zoom support article.

If you have further questions about Zoom meetings or any of our other institution-supported educational technology, please feel free to email us at elearning@mtu.edu

Importing Content in a Canvas Course

When preparing for a new semester of teaching one common job on your list is to import instructional materials from a previous course. Canvas provides a robust tool for this job with with options to customize which content to import. Read on as we review the options and some important considerations when importing content to a Canvas course.

Import Course Content

Import Course Content option from course settings sidebar

From the course Settings you choose the “Import Course Content” option to begin importing content from another Canvas course that you have instructor access in. Choosing the option “Copy a Canvas Course” for a content type will let you search for the course you want to import from. Courses will be listed alphabetically by most recent term. Once your source course is selected you have the option to simply import all content OR select specific content.

Import Content Options

How much content do you need?

Be thoughtful here. If you really only need some assignments and files from a previous course, choosing specific content can be a better option. There are many Canvas courses out there with lots of unused legacy content that just creates clutter and confusion for both the instructor and their students. So just import the content you really need for the new semester. You can always come back and import other items you may have missed.

Select Content Dialog

Canvas makes it pretty easy to choose specific content. Once you choose the “Select Specific Content” option from the Import Content menu you click the blue Import button. This cues up the import job in Canvas and provides you a Select Content button. When you click this, Canvas will display all content in the course you are importing from, sorted by type (modules, assignments, quizzes, etc.). You can expand the content item menu and check the boxes for just the items you need. Once you identify all content needed click the Select Content button to begin the import process. If you forget and item or two, no problem. Just start a new import job using the same process to retrieve any additional content you need.

Adjusting assignment dates

During the import process Canvas provides the option to retain assignment and events dates for the content you are importing. In most cases you will not want to use the old dates. Canvas lets you adjust dates by checking the options box and then either shifting dates for the imported content or removing dates entirely. Removing dates is often a good choice since it removes the possibility of you using an assignment with old dates and possibly creating an access problem for your students. All content comes into the new course clean and you can add current term due dates and availability dates when you are ready. The adjustment date feature works for assignments, announcements, quizzes, modules and files.

A powerful feature when used carefully

The course import tool can save instructors lots of time during course setup. The ability to use the custom features to target specific content for import and the ability to shift or remove dates can mean less time spent managing legacy content in your next course and more time available for creating new content and teaching.

Resource


Need Help?

Contact the elearning support team in the Jackson Center for Teaching and Learning if you have questions about Canvas, Huskycast, Zoom or other educational technology tools.

elearning@mtu.edu | 487-3000