Month: February 2021

Using Math in your Canvas Course Content

Do you use math content in your Canvas course pages, assignments, quizzes, etc.? Do you struggle with how to insert math expressions properly? Do you insert images of math expressions (inherently inaccessible)?

Using math in your Canvas instructional materials can be challenging. Making sure that content is digitally accessible to all learners is more important now that ever with the dramatic shift to remote instruction during the pandemic. Let’s review some options and best practices for creating accessible math expressions in your Canvas instructional content.

Insert Options in Canvas

The Canvas Rich Content Editor (RCE), available throughout Canvas (content pages, discussions, assignments and quizzes) offers some powerful tools for inserting math.

Equation Editor

Canvas equation Editor
Canvas equation editor (basic view)

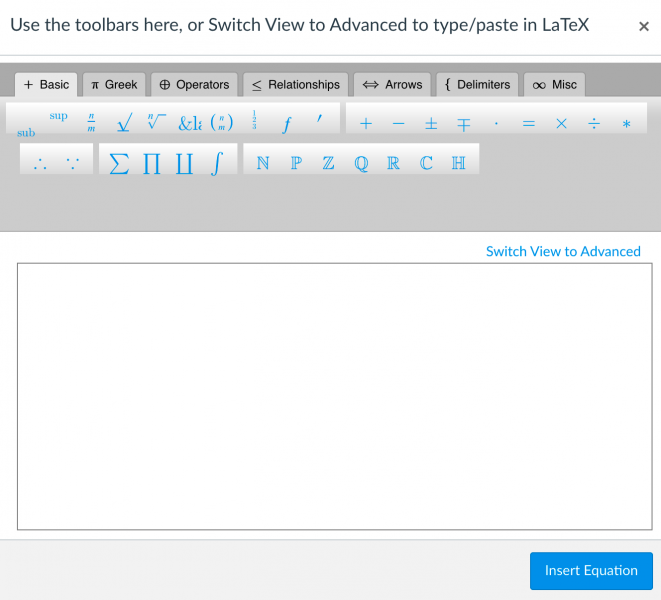
The Canvas equation editor allows you to build math expressions from scratch using the available toolbars in the basic view. This option is similar to equation editors you may have used in Word, for example. When you click on the advanced view option you can enter LaTeX code. LaTeX is a markup language commonly used for typesetting technical content (like math expressions) in documents. If you are fluent with LaTeX, the advanced equation editor can be an efficient method of placing math in your course content.

MathJax

Recently, Canvas announced a plan for extended support and enhanced digital accessibility of LaTex-based math expressions. Once implemented by Canvas, properly formatted LaTeX will be able to be added directly in any text field in Canvas, including in page and assignment titles and calendar entries. By including the required formatting that specifies inline or block formatting of the math, Canvas will work with the browser to display the math properly using a JavaScript display technology called MathJax. You won’t need to worry about the MathJax magic though, you just need to enter accurate LaTeX code and format it for the desired display type and it should just work. The great advantage here is that math expressions entered this way are accessible to people using an assistive technology called a screen reader. This feature was originally released on February 20, but there have been a few glitches and Canvas has pulled it back for now. Hopefully it will be available again soon.

2021-02-23_14-58-34 (1).gif
Inserting math expressions with LaTeX in Canvas rich content editor

EquatIO

Another powerful tool for creating digital math is EquatIO, available from the apps menu in the Canvas RCE. When not in Canvas you can also download EquatIO for Mac or Windows and run it on your computer, or as an extension in the Chrome browser (register it with your MTU email address to get access to premium features).

EquatIO App in the Canvas RCE toolbar

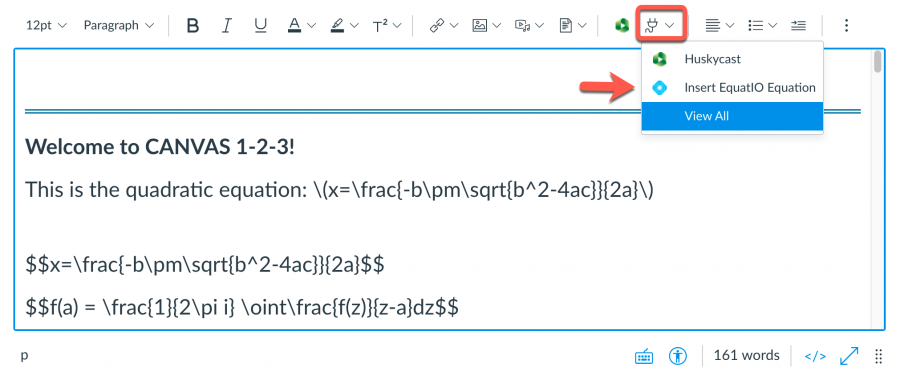
EquatIO offers several inputs methods for inserting math in Canvas, including the type-as-you-go equation editor, LaTeX, and handwritten or spoken math expressions.

EquatIO insert menu in Canvas
EquatIO editor (showing LaTeX input method) in Canvas RCE

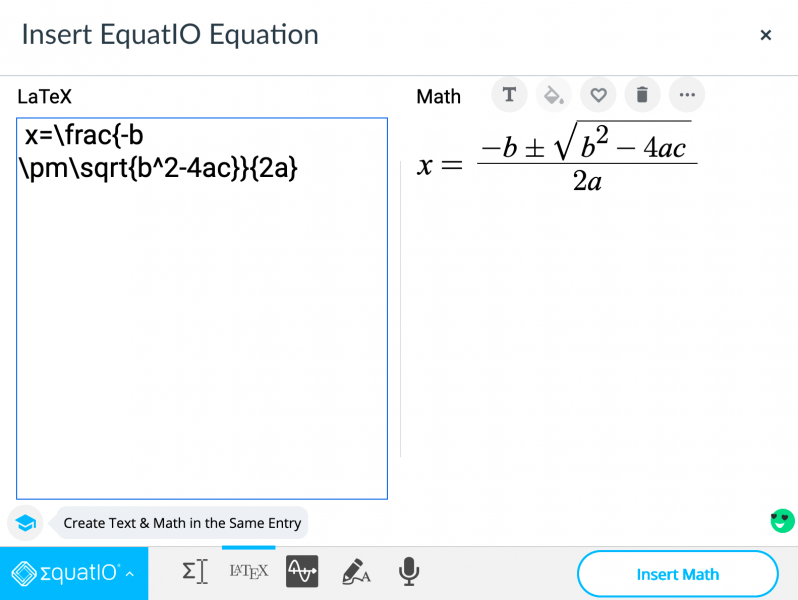
The equation editor features prediction to help speed up the input workflow. So when you type “sq” for example, EquatIO offers options like “squared” or “square root”. You can also enter LaTeX math and EquatIO will insert the expression as an image file that includes accurate alternative text to support screen reader users. If you have a touch-based device you can write out math by hand and EquatIO will similarly convert it to an image of the expression. You can also speak math using your microphone and EquatIO will convert to digital math. Both the handwritten and spoken input options can work quite well as long as you can write reasonably well or speak clearly without too much background noise.

EquatIO Works Great for Students Too

Students can also use EquatIO to input math expressions anywhere in Canvas that they have access to the RCE, such as in a discussion post, or a text-based response in a quiz. EquatIO also supports students who may struggle with interpreting math expressions, a disorder called dyscalculia. The standalone EquatIO application (available to all MTU students, staff, faculty) includes an additional tool called the screenshot reader. This powerful feature allows students (or anyone else) to select a math expression on their computer screen. EquatIO then applies optical character recognition (OCR) and provides options to listen to the expression read back to them, or to read a text-based version of the expression to help with comprehension. Next time you need to add math to your Canvas content consider using one of these approaches to make your math digital and more accessible.

Resources


Need Help?

Contact the elearning support team in the Jackson Center for Teaching and Learning if you have questions about Canvas, Huskycast, Zoom or other educational technology tools.

elearning@mtu.edu | 487-3000

Learning from each other – Peer Review Assignments

To strengthen students’ written work, instructors will spend a great deal of time providing detailed feedback in the hopes that students will apply the suggestions to their next written assignment. Unfortunately, many instructors feel that their efforts to provide feedback is being overlooked or not appreciated by the students.

What if an instructor could reduce the burden of providing all the detailed feedback YET increase students engagement in the review process? Maybe even strengthen their writing skills and assessment skills in the process…

Peer Review Assignments

Think about the possibility of having students review each others work and provide each other feedback. If you read through the body of literature, you will find many supporting arguments which state that peer review in the feedback process provides many benefits to students learning.

Benefits of Peer Review

  • Ability to become more aware of alternative perspectives on a topic.
  • Lifelong learning skills in how to effectively assess another person’s work.
  • Building self-assessment of their work by benchmarking themselves against their peers.
  • Critical thinking and diplomacy skills.

Canvas Peer Review Assignments

A Canvas Peer Review Assignment allows students to provide feedback on another student’s assignment submission. Setting up an assignment for peer review is fairly simple within Canvas. One of the options when setting up a new assignment is to designate it as a Peer Review assignment. You can select to manually or automatically assign the peer reviews. There is an option to set up the peer reviews to be anonymous or you can include a rubric for the reviewer to complete as the peer review. Peer reviews can not be used with External Tool Assignments.

Peer Review options in Assignments

Students will see a list of peer reviews assigned to them within the assignment. Based on how the assignment submission is designated, the student could annotate the document, add a comment in the comment field or complete the included rubric. A student reviewing another student’s assignment would need to leave at least one comment in order for the review to be considered complete.

Students will see their peers’ reviews in the right sidebar of the Canvas course under Recent Feedback. A student can simply click on the assignment title to access the feedback.

If you would like to learn more about using Peer Review Assignments in Canvas, feel free to contact us at elearning@mtu.edu

Respondus Live Proctoring; Is this the right tool for your class?

Lockdown Browser +Instructor Live Proctoring

Pandemic-induced remote instruction practices have brought new challenges for protecting the integrity of student assessments. If you can’t administer your exam in the classroom and can’t use the services of the Michigan Tech Testing Center (students not campus-based) there are other options.

Michigan Tech instructors have had access to Respondus LockDown Browser and Respondus Monitor to support online assessments for some time. Now a third option called Respondus Live Proctoring is available. To review, LockDown Browser is a dedicated browser designed to confine the testing environment to Canvas. A companion tool called Respondus Monitor builds on this by leveraging student webcams and video analytics to help deter cheating in non-proctored environments. Instructor Live Proctoring adds to the Respondus toolbox by working in conjunction with LockDown Browser and Zoom to allow instructors to proctor exams live (via a Zoom meeting) for small classes (Respondus recommends up to 25). Let’s take a closer look at this new option.

To use Respondus Live Proctoring instructors create a Canvas assessment using the Quiz tool and then enable Respondus LockDown Browser and Live Proctoring from the LockDown Browser dashboard available in the Canvas course navigation.

Respondus Lockdown Browser dashboard in Canvas
Respondus LockDown Browser Dashboard
Live Proctoring Settings
Respondus Live Proctoring Setting

To avoid test day complications make sure students have previously installed LockDown Browser on the computer they will be taking the exam on. At test time students join the Zoom meeting for last minute instructions, attendance, and a start code that will allow them to open the exam from LockDown Browser. Canvas Classic Quizzes (used by most MTU instructors currently) require students to first open LockDown Browser, log in to the Canvas course, and then open the quiz. Once the quiz is opened in LockDown Browser, students are confined to the quiz environment, but the Zoom meeting is still active in the background. This allows the instructor to proctor students via their webcams in the Zoom meeting.

Important Considerations

The CTL recently tested the Live Proctoring feature and offers the following observations and guidance.

Test, test, test

It’s important to test this workflow before an actual exam. Creating a simple Canvas test quiz with the Live Proctoring feature enabled will allow for this. Students will have an opportunity to install LockDown Browser and open the test quiz to confirm that their system is working properly. This also gives you a chance to experience what Live Proctoring “looks like” from a Zoom meeting. As noted earlier, Respondus recommends this feature for small class sizes (no more than 25).

Limited communication during quiz

Once the Canvas quiz is underway the instructor maintains full access to the Zoom meeting while students have NO ACCESS to the Zoom meeting. As long as students leave their webcam and microphone on before starting the quiz the instructor will still be able to see and hear them. This also means that other students can hear them as well. As the instructor, you get to decide how to manage any potential distraction that may arise. You could ask students to mute their microphone before they open the quiz in LockDown Browser. Or you could ask students to leave their microphone on, but complete the exam in a quiet space to avoid distractions. You could also mute individual student microphones from your Zoom controls if distractions arise during the quiz.

It is technically possible for instructors to make an announcement in the Zoom meeting during the quiz, but students would not see the instructor. One option might be to inform students in advance that you will ask for questions at a predetermined time so students know there will be an opportunity to ask a question at some point. All students would hear any discussion between any one student and the instructor.

Live Proctoring is different that Monitor

The Live Proctoring feature does not record students during the test and does not provide instructors with any alerts of suspicious activity during exam time. That’s the job of the instructor. Automated recording and alerts is only available in the automated Respondus Monitor proctoring solution.

Resources


Need Help?

Contact the elearning support team in the Jackson Center for Teaching and Learning if you have questions about Canvas, Huskycast, Zoom or other educational technology tools.

elearning@mtu.edu | 487-3000

Assignment Feature in iClicker Cloud

Do you currently use iClicker Cloud to poll students during class?…do you wish you could poll students outside of class….say after a chapter reading to gauge their level of understanding of the content?

With iClicker Cloud’s new asynchronous Assignment feature you can create low-stakes assessments that can be completed outside of class and at a student’s own pace.

Examples of when to use iClicker Cloud Assignment

  • Before class – gauge students’ understanding or preparedness for upcoming lectures, chapter readings or homework understanding.
  • During class – for small group activities.
  • After class – to support homework activities.

Setting up iClicker Cloud Assignments

Within the iClicker Cloud Instructor Website, you can create questions for the iClicker Cloud Assignment.

  1. Create your lecture slides as you normally do. Include a slide for each iClicker question. iClicker Cloud Assignment supports Multiple Choice, Short Answer and Target question types.
  2. Extract your iClicker question slides from the main presentation. A separate file that contains only question slides can be used in an iClicker Cloud Assignment.
  3. Export the question slides file as a PDF.
  4. Go to the iClicker Cloud Instructor Website and create the assignment.
  5. Add the assignment details and upload the PDF that contains the question slides.
  6. Format the Assignment. The assignment has now been added to your “Assignments” page where you are able to manage, edit, view grades and export grades to your LMS.
  7. Based on the release date that you set for the assignment, students will now be able to see the assignment(s).
  8. Scores from completed assignments can be manually uploaded into Canvas.

Student access to Assignments

Be sure to let your students know that you are now using Assignments in iClicker. A student can complete the assignment by finding the instructor’s course in their list of courses and selecting Assignments from the menu. Here is a helpful guide to provide your students on Accessing an Assignment in iClicker Reef.

If you have questions about using iClicker Cloud Assignments, Canvas, Zoom or Huskycast, feel free to contact us at elearning@mtu.edu

Three Huskycast features you should know about

Huskycast

Huskycast is Michigan Tech’s branded Panopto video platform. In the years leading up to the pandemic we saw a steady increase in video usage, both in lecture capture recordings and in content uploaded to the system. With the dramatic shift to remote instruction over the last year video usage has exploded (not surprisingly). With more users than ever creating and/or viewing content in Huskycast let’s review three great features that you may not know about.

Panopto-Zoom Integration

Many instructors are using Zoom to provide a synchronous remote environment for their course meetings. The ability to record Zoom sessions is a great way to allow students to review the class sessions again, or to catch up on sessions they may have missed. With the use of a recurring Zoom cloud meeting instructors can automatically have their recordings transferred to a designated Huskycast course folder in Canvas. This can save you lots of time managing content between Zoom and Huskycast and all students enrolled in the associated Canvas course automatically have access to view the recordings. You don’t need to manually share links to the recordings either, since students can just click on the Huskycast course link and select the recording they wish to view. You can learn more about this integration and contact elearning with any questions. Don’t forget to enable the audio-transcript option in your Zoom recording so that a transcript file will transfer to Huskycast along with the Zoom recording.

Video Assignments

Looking to provide your students with an alternative mode for demonstrating competency of your course objectives (multiple means of action and expression)? Why not consider using video? Huskycast allows instructors to create video-based assignments that students can submit directly in Canvas. Students can use the available recording tools in Huskycast to create their video, use other video software, or just record on their phone. When they’re ready they can upload the video either directly in the Canvas video assignment, or into the Huskycast assignment folder in the course. By default student-submitted videos are viewable by only the instructor (and the submitting student), but you have the option to allow other students to view and comment on videos if desired. Some examples of effective video assignments:

  • Student introductions
  • Video-based discussion post
  • Multimedia-based final project presentation
  • Student teach-back session (students explain new concepts they recently learned)

Embedded Quizzes

A low-stakes knowledge check can be a good pedagogical tool for measuring student comprehension during instruction. In Huskycast you can add a quiz and ask one or more questions within your videos. This quiz allows learners to verify comprehension and can give them confidence to learn deeper. When building the quiz you can require correct answers before moving on, or just provide correct answers. You can even create Canvas assignments tied to a Huskycast quiz and have the points earner for correct responses be recorded in the Canvas grade book. Multiple choice, multiple answer, true/false, and fill in the blank questions types are available in Panopto-Huskycast quizzes.

Resources

Need Help?

Contact the elearning support team in the Jackson Center for Teaching and Learning if you have questions about Canvas, Huskycast, Zoom or other educational technology tools.

elearning@mtu.edu | 487-3000

Uploading a file in Canvas for an Assessment

Throughout the semester, the elearning team addresses lots of great questions on various ways that one can leverage Canvas for student assessment. One question we often address is, “What is the best way to have students upload a pdf of their handwritten work they did for a quiz?

Courtesy of Pexels

Great Question!…in order to answer this, we need to first consider the following:

  • Do you want to be able to annotate the pdfs within Canvas? Do you prefer to download the pdfs, annotate w/ an external tool and re-upload into Canvas?
  • Do you use Respondus Lockdown Browser for your quiz?
  • Is it a timed quiz?

If you answered yes to any or all of these questions, we recommend that you…

Offer an Assignment directly after the Quiz for file submission

Why?….

Due to some limitations with Canvas Quizzes a preview of the pdf in Speedgrader is not available nor does Canvas Quizzes offer the ability to re-upload submissions! Using Respondus LockDown Browser may limit students ability to create a pdf and a timed quiz may not allow sufficient time for a student to scan and upload the file. Frustrating…I know… but the workaround of offering an assignment directly after students complete the quiz will resolve these frustrations! To do this….

Adding a ‘File Upload’ question type to the end of a Canvas Quiz

If you happened to answer No to any or all of the questions stated above, you can simply define the last question on your quiz as a ‘file upload‘ question type. This will allow students to upload their pdf as the final step in completing the exam. As a word of caution though…you will still need to download each submission from Speedgrader in order to review and grade the file.

Remember, in either case, students will need some time to scan their handwritten document, convert it into a pdf and upload it.

If you have an idea for a future blog topic that you would like us to address or just need additional support with Canvas, Zoom or Huskycast, please email elearning@mtu.edu

Canvas content pages or PDF’s: Is there a better approach?

You probably have lots of instructional materials loaded into your Canvas courses. You can present information from custom web pages, called content pages. You can also upload files into Canvas (documents, presentations, etc.). Is one approach better than another? While there is no single correct answer for all situations, considering your students needs when determining how to provide course materials can be a good approach.

Content Pages

A content page in Canvas is actually an HTML web page created with the tools available in the Rich Content Editor (RCE). Although you can enter HTML code to create this page, most folks use the visual RCE tools for this process. Providing instruction from a content page has some advantages for your students:

  • Can be accessed from a desktop/laptop computer, or mobile device (via Canvas student app) without the need to download or open other software.
  • Page content is responsive (adapts to reader preferences and display/device limitations).
  • Well-designed content pages work seamlessly with assistive technology

The Canvas RCE has tools for inserting and styling text, adding images and videos, and linking to other course resources or external sites. You can insert tables and math expressions (manually created or via LaTeX). You can also build math expressions using a variety of input methods from the powerful EquatIO tool available from the Apps tool (plug icon) in the RCE. A built in accessibility checker is also available to check for some common errors, such as missing alternative text descriptions for images, missing table headers, and proper heading and list structure.

In many instances a well-structured Canvas content page can offer the best experience for your students, providing them the flexibility to access the content from various devices and without need for additional software.

PDF’s

Documents can be shared in many formats, but the most common (by far) is PDF. Documents usually originate in Word or Google format, or PowerPoint presentation files. Uploading these files to your Canvas course to share with students requires them to have the necessary software to open these formats. Students must also download the files and then open locally on their computer and may need access to a printer if they require a hard copy.

Providing documents in PDF format can eliminate some of the software restrictions. Students can download the free Adobe Reader (or use another PDF viewer available with their operating system) to access the PDF course materials. In most cases, the document will look exactly the same as when you designed it (assuming you have exported it properly). For the syllabus or other important course documents a printable PDF can be an valuable resource.

Document Structure

It’s very important that you use the correct workflow for exporting your documents. This usually means using the “export to PDF” or “save as PDF” options in your text editor to create your document. Never use the “Print to PDF” option! The resulting PDF will be an image based file that will have none of the underlying structural elements that are very important to students who use assistive technology, or for anyone who needs to modify the document for optimal viewing.

This underlying structure is equally important when sharing PDF’s from online journals or scanned from physical textbooks. Unfortunately many journals are still not providing fully accessible documents. Scanned documents are often inherently inaccessible (image-based) and very difficult to use by all learners. In both cases students can face serious digital barriers to access if they are using assistive technology. The Ally accessibility checker included in Canvas will scan all documents in your course and provide an accessibility score and guidance for how to make improvements, if needed.

A Van Pelt and Opie librarian can help you locate accessible course resources from journals and publications and the Jackson Center for Teaching and Learning is available to consult about best options for creating and sharing course materials with your students in Canvas.

Resources

Creating Accessible Documents
Creating Accessible Presentations


Need Help?

Contact the elearning support team in the Jackson Center for Teaching and Learning if you have questions about Canvas, Huskycast, Zoom or other educational technology tools.

elearning@mtu.edu | 487-3000