Author: Linda Wanless

iClicker Cloud Polling Question Types

Over the course of the past year, many instructors have incorporated iClicker Cloud into their online or remote learning environments as a way to engage students in the course content. Students are able to respond to questions via their mobile device, tablet or laptop using the mobile/website application known as iClicker Student App

.

The ability for students to answer questions via a mobile device, tablet or laptop, opens up the opportunity for instructors to ask varied question types during the polling session. An instructor is no longer limited to just asking multiple choice type questions! iClicker Cloud offers the options of multiple answer, short answer, numeric and target type questions.
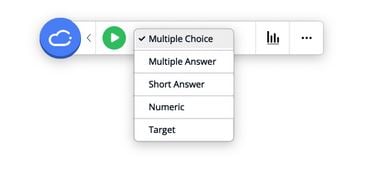
iClicker question types

Question Types

  • Multiple Answer – A multiple answer question type engages the student in evaluating each response for correctness or incorrectness instead of simply finding the single ‘best’ answer in a multiple choice type question. Multiple Answer questions allow for a maximum span of six responses (A-F) to choice from. The Results Chart will show number of responses that are correct, partially correct and incorrect.
  • Short Answer – A short answer question type allows the instructor to ask an open-ended question. Students have the ability to enter up to a 140 character response. The Results Chart will group identical answers together. The instructor has the option to ‘star’ the best response. If the responses are one or two word phrases, the instructor also has the option to display this as a Word Cloud.
  • Numeric – The numeric question type allows students to respond with up to an eight digit (plus decimal point) answer. Just like the short answer, identical answers will be grouped together in the Results chart and the instructor can ‘star’ the best answer.
  • Target – A target question type allows the instructor to provide an image to the student. The student would touch or click (based on device capability) on the appropriate portion of the image to answer the question. Students using any type of iClicker remote will not be able to respond to this question type.

Anonymous Polling

iClicker Cloud also allows an instructor to ask any of the question types listed above in Anonymous mode. To switch to anonymous mode, select the menu icon and turn Anonymous to ‘on’. The toolbar background will turn black to indicate Anonymous mode. *Performance points can NOT be given during Anonymous mode.

Anonymous mode in iClicker Cloud

Additional support for iClicker Cloud

If you have further questions or would like additional support in using iClicker Cloud, feel free to reach out to the elearning team at elearning@mtu.edu or contact the CTL at 487-3000.

Regrade Option for a quiz question

Have you ever written and published a quiz only to find out later that you had an incorrect answer marked on a multiple choice question or your students have pointed out that the True/False question should have been True not False!

Now that all (or most of) the students have taken the quiz how do you go back and update the quiz question to reflect the correct answer??

Canvas offers a Regrade Option for Multiple Choice, True/False and Multiple Answer type questions. The Regrade Option will become available when you change the question to reflect the correct answer. Canvas will present you with a Regrade Option box that offers four regrade options based on your situation.

Canvas Regrade Option
  1. Award points for both corrected and previously correct answers – This option should be used for Multiple Choice questions where you determine that the question was written with more than one answer that would be accepted as correct. Please note: this option is not available for a Multiple Answer type question.
  2. Only award points for the correct answer -use this option when you have marked an incorrect answer as the correct answer and would like points to reflect the correct answer.
  3. Give everyone full credit for this question – In some instances, the answer options on a question may have written in such a way that it created confusion or misinterpretation for the student and you prefer to give everyone credit towards the question.
  4. Update question without regrading – This option will allow you to update your question to the correct answer but will not change the points earned by students who have already taken the quiz.

Regrade Option not available for the following quiz question changes

If you are making any of the changes listed below, it is recommended that you moderate the quiz and allow students who have taken the quiz an additional attempt in order to see the updated version of the quiz.

  • The Regrade Option is not available when you are adding or removing a question from a quiz.
  • Adding or deleting answers from a question will disable the Regrade option from being available.
  • Changing the points value of a question does not enable the Regrade Option.

One last note….the Regrade Option does not apply to questions linked to question banks!

Reach out to us!

If you would like to learn more about Canvas quizzes or other features available within the Canvas learning management system, feel free to email us at elearning@mtu.edu

Editing a Video

We have all been busy lately making recordings -whether its pre-recording a lecture from your office or recording a live Zoom class session. Afterwards, we upload these recordings into the appropriate Panopto-Huskycast course folder for students to view.

Have you ever gone back and reviewed the video only to realize that the first couple minutes of the recording consisted of you still getting prepared to start your lecture or maybe the last couple minutes consisted of addressing some students’ personal questions….wouldn’t it be nice if you could quickly trim those unnecessary beginning or endings off of your recordings? Panopto-Huskycast provides a video editor within your video library which will allow you to quickly trim a section of content from your video.

Panopto Editor

Edit mode in Panopto

Login to Huskycast.mtu.edu with your Canvas credentials and find a video in your video library that you would like to edit. Hover your mouse over the video, you will notice some additional options appear including ‘Edit’. Click on ‘edit’ and the video will then open into the Panopto Editor. At the bottom of the editor, you will see a separate row for each stream captured in the video. A stream can be defined as a separate section in the editor for each video, audio or presentation content you recorded.

Panopto Editor video streams

Cut Tool

You will notice a scissors in the upper left corner just above the video streams. This is known as the cut tool and is used to trim content from the video. Let’s say you wanted to trim off the first two minutes and 14secs of your video. You would play the video and pause it after two minutes and 14 seconds. You will notice a red vertical line in the stream designating this point in the video. Next, click on the scissors. You will notice a dark gray line at the beginning and ending of the video stream. Click and drag the dark gray line at the beginning of the stream until it meets up with the red vertical line.

Select ‘Apply’ in the upper right corner of the screen when you have your edits defined. This will apply the changes. As a side note, the Panopto Editor is non-destructive…you can always add those cuts back in if you ever need to or happen to cut out the wrong content!

Additional Resources

How to edit a video

How to trim a video in the editor (including steps on trimming an individual stream)

If you would like additional support with managing your Panopto-Huskycast recordings, contact us at elearning@mtu.edu.

Learning from each other – Peer Review Assignments

To strengthen students’ written work, instructors will spend a great deal of time providing detailed feedback in the hopes that students will apply the suggestions to their next written assignment. Unfortunately, many instructors feel that their efforts to provide feedback is being overlooked or not appreciated by the students.

What if an instructor could reduce the burden of providing all the detailed feedback YET increase students engagement in the review process? Maybe even strengthen their writing skills and assessment skills in the process…

Peer Review Assignments

Think about the possibility of having students review each others work and provide each other feedback. If you read through the body of literature, you will find many supporting arguments which state that peer review in the feedback process provides many benefits to students learning.

Benefits of Peer Review

  • Ability to become more aware of alternative perspectives on a topic.
  • Lifelong learning skills in how to effectively assess another person’s work.
  • Building self-assessment of their work by benchmarking themselves against their peers.
  • Critical thinking and diplomacy skills.

Canvas Peer Review Assignments

A Canvas Peer Review Assignment allows students to provide feedback on another student’s assignment submission. Setting up an assignment for peer review is fairly simple within Canvas. One of the options when setting up a new assignment is to designate it as a Peer Review assignment. You can select to manually or automatically assign the peer reviews. There is an option to set up the peer reviews to be anonymous or you can include a rubric for the reviewer to complete as the peer review. Peer reviews can not be used with External Tool Assignments.

Peer Review options in Assignments

Students will see a list of peer reviews assigned to them within the assignment. Based on how the assignment submission is designated, the student could annotate the document, add a comment in the comment field or complete the included rubric. A student reviewing another student’s assignment would need to leave at least one comment in order for the review to be considered complete.

Students will see their peers’ reviews in the right sidebar of the Canvas course under Recent Feedback. A student can simply click on the assignment title to access the feedback.

If you would like to learn more about using Peer Review Assignments in Canvas, feel free to contact us at elearning@mtu.edu

Assignment Feature in iClicker Cloud

Do you currently use iClicker Cloud to poll students during class?…do you wish you could poll students outside of class….say after a chapter reading to gauge their level of understanding of the content?

With iClicker Cloud’s new asynchronous Assignment feature you can create low-stakes assessments that can be completed outside of class and at a student’s own pace.

Examples of when to use iClicker Cloud Assignment

  • Before class – gauge students’ understanding or preparedness for upcoming lectures, chapter readings or homework understanding.
  • During class – for small group activities.
  • After class – to support homework activities.

Setting up iClicker Cloud Assignments

Within the iClicker Cloud Instructor Website, you can create questions for the iClicker Cloud Assignment.

  1. Create your lecture slides as you normally do. Include a slide for each iClicker question. iClicker Cloud Assignment supports Multiple Choice, Short Answer and Target question types.
  2. Extract your iClicker question slides from the main presentation. A separate file that contains only question slides can be used in an iClicker Cloud Assignment.
  3. Export the question slides file as a PDF.
  4. Go to the iClicker Cloud Instructor Website and create the assignment.
  5. Add the assignment details and upload the PDF that contains the question slides.
  6. Format the Assignment. The assignment has now been added to your “Assignments” page where you are able to manage, edit, view grades and export grades to your LMS.
  7. Based on the release date that you set for the assignment, students will now be able to see the assignment(s).
  8. Scores from completed assignments can be manually uploaded into Canvas.

Student access to Assignments

Be sure to let your students know that you are now using Assignments in iClicker. A student can complete the assignment by finding the instructor’s course in their list of courses and selecting Assignments from the menu. Here is a helpful guide to provide your students on Accessing an Assignment in iClicker Reef.

If you have questions about using iClicker Cloud Assignments, Canvas, Zoom or Huskycast, feel free to contact us at elearning@mtu.edu

Uploading a file in Canvas for an Assessment

Throughout the semester, the elearning team addresses lots of great questions on various ways that one can leverage Canvas for student assessment. One question we often address is, “What is the best way to have students upload a pdf of their handwritten work they did for a quiz?

Courtesy of Pexels

Great Question!…in order to answer this, we need to first consider the following:

  • Do you want to be able to annotate the pdfs within Canvas? Do you prefer to download the pdfs, annotate w/ an external tool and re-upload into Canvas?
  • Do you use Respondus Lockdown Browser for your quiz?
  • Is it a timed quiz?

If you answered yes to any or all of these questions, we recommend that you…

Offer an Assignment directly after the Quiz for file submission

Why?….

Due to some limitations with Canvas Quizzes a preview of the pdf in Speedgrader is not available nor does Canvas Quizzes offer the ability to re-upload submissions! Using Respondus LockDown Browser may limit students ability to create a pdf and a timed quiz may not allow sufficient time for a student to scan and upload the file. Frustrating…I know… but the workaround of offering an assignment directly after students complete the quiz will resolve these frustrations! To do this….

Adding a ‘File Upload’ question type to the end of a Canvas Quiz

If you happened to answer No to any or all of the questions stated above, you can simply define the last question on your quiz as a ‘file upload‘ question type. This will allow students to upload their pdf as the final step in completing the exam. As a word of caution though…you will still need to download each submission from Speedgrader in order to review and grade the file.

Remember, in either case, students will need some time to scan their handwritten document, convert it into a pdf and upload it.

If you have an idea for a future blog topic that you would like us to address or just need additional support with Canvas, Zoom or Huskycast, please email elearning@mtu.edu

In-Class Polling

Interested in polling your classes? Have you heard the terms iClicker Classic, iClicker Cloud and REEF? You may be wondering what the differences are between these terms and where to start with in-class polling. Let’s begin by defining these terms…

Photo courtesy of Pexels

iClicker Cloud, REEF and iClicker Classic

iClicker Cloud is a platform that allows an instructor to run synchronous polling, quizzing and attendance activities in class. iClicker Cloud can be downloaded to a Windows or Mac system. REEF is the mobile/website application students use to participate in the polling, quizzes and attendance. To connect with the course, students run the REEF app from a mobile device, tablet or laptop. REEF is available to students for a small one-time subscription fee.  iClicker Classic is classroom-based polling software designed for use with physical clicker remotes, but can also support student responses from the REEF app if configured properly. 

Getting Started with iClicker Cloud for Remote Instruction

Instructors who want to use iClicker Cloud for Remote Instruction, can establish a free account at iClicker.com. Setting up your account will include setting up the names and details of your courses so that students can easily find them on REEF app. Once your account and courses are established, you can download the iClicker Cloud desktop software and you are ready to start polling. Want to run some practice polling sessions before you go live in your classes? Your iClicker account allows you access to a (free, limited term)student REEF account, so you can practice answering your own polling questions as a student…so let’s get started! Here is a great QuickStart Guide: Using iClicker for Remote Instruction that outlines the details.

Incorporating REEF into an iClicker Classic class session.

Are you currently using iClicker Classic polling software (designed for use with physical clicker remotes) in your face-to-face classes but want to allow students to be able to respond to your polling using their smartphone, tablets or laptops? You can do this by simply enabling iClicker REEF in your iClicker Classic software.

Additional Resources

For additional resources on student polling, be sure to visit the Jackson Center for Teaching and Learning Instructional Resources webpage

Need Help?

Contact the elearning support team (elearning@mtu.edu) in the Jackson Center for Teaching and Learning if you have questions about Canvas, Huskycast, Zoom or other educational technology tools.

Turnitin Similarity Report offers a new feature!

Image courtesy of Pexels

Turnitin can be applied to a Canvas assignment as a way to detect plagiarism by identifying unoriginal content submitted in a written assignment. When Turnitin is applied to a Canvas assignment, a Similarity Report is generated and uploaded into the Canvas gradebook. This report identifies the percentage of content from the written assignment that matches with Turnitin’s repository of previous student submissions, publications, etc. Upon review of the similarity report, you may notice that some of the exact matches of content are to be expected, such as the assignment instructions or assignment layout that was provided, cited work or valid collaboration. Ever wish you could view the similarity report without these expected matches?

Text Match Exclusion Feature

Turnitin has just launched their Text Match Exclusion feature! This feature allows you to do just that. You can select the match you would like to exclude and then click the “Exclude this text” in the upper left corner of the Similarity Report and choose why you would like to exclude it.

Image provided by Turnitin

Re-instate excluded matches

If you decide later on that you did not want to exclude a section of content from the Similarity Report, you can easily re-instate the matched content by selecting Similarity Exclusions from the Right-side panel menu and selecting the “eye” icon.

Interested in learning more about Turnitin or need further assistance in interpreting the Similarity report? Reach out to elearning@mtu.edu with your questions.

Helpful Tips To Building a Canvas Course

Photo courtesy of Pexels

The start of each new semester brings with it the opportunity to build new Canvas courses for each of your classes. Building these courses each semester may seem a little overwhelming…right? It can be especially overwhelming for those who teach several classes, those who are new to teaching or using a learning management system.

Not sure where to start in building your courses? This blog post will walk you through several helpful tips to develop the basic structure and content of your Canvas course so it will be ready to publish in no time at all!

Re-purpose previous course content

Have you taught this course before? Do you have some great course content you wish you could use again? Canvas provides you the ability to import course content from any previous course where you were enrolled as an instructor. You can import a single assignment or the entire course.

Take advantage of the Homepage Template

Want to create a homepage quickly and easily even without much understanding of the Rich Content Editor? Each Canvas course has a Instructor Info Front Page Template already available for you to use. Simply select the template to be the front page and edit the page to include your course and instructor information. The homepage is also an excellent place to post a link to your syllabus!

Establish Assignment Groups

Course content can be divided into categories (ex. quizzes, homework, projects, etc.) with each category having a defined percentage of the final grade applied to it. These categories are known in Canvas as Assignment Groups. By initially defining the assignment groups, percentage value and course content, Canvas can easily calculate the course grades for you as the semester progresses. Each time you create an assignment, you can designate which assignment group it should reside under.

Plan your course structure

Having a structured organization to your course content can make it easier for your students to navigate through your course. Course content can be easily organized by weeks, units, chapters, etc. using Canvas Modules. The modules can be set up with requirements so students need to work through the content in a specified sequence. Lock/unlock dates can be placed on Modules–this allows the instructor to create and publish content within a module but the content in the module is not visible to students until a defined date.

Familiarize yourself with the gradebook

The Canvas gradebook provides a wealth of detail about course grades. Canvas uses many color codes, icons, views and grading type symbols to convey the detail about each students’ submission/score. It is helpful to take a few minutes to familiarize yourself with the layout of the gradebook as well as the color codes and icons.

Hope these tips prove useful to you when setting up your Canvas courses! Have a Canvas question you need answered? Contact the elearning team at elearning@mtu.edu.