Welcome back to the Michigan Tech Graduate School Newsblog. Since Thesis, Dissertation, and Report writing season is in full swing now we thought it might be helpful to give you a brief reminder on how you can check your margins before submitting your document to the Graduate School.
There are two ways described in “The Guide” to format your dissertation, thesis, or report: Single Side and Double Side formatting. In the post below we will walk you through how to use Adobe Acrobat Pro to check your margins in a Single Side formatted document. If you’re using Double Side formatting, check out our post on that here!
Turning on Grids and Rulers
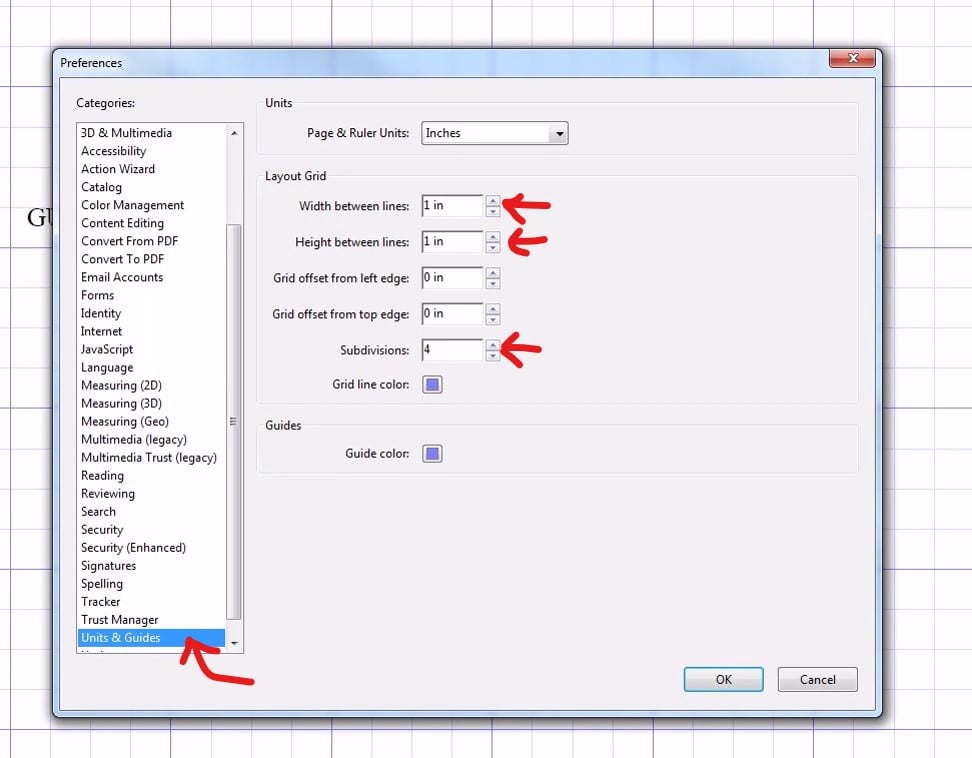
If you know how to turn on Grids, you may notice that Adobe defaults to a 3×3 grid. Since we have a binding edge margin requirement of 1.5″ and a non-binding edge requirement of 1″ it really isn’t all that helpful if our grid is in 1/3 inch increments. To improve functionality we need to change the grids to 4×4 (this gives us 1/4″ grid lines). To do this, you will want to go to Edit> Preferences. That’s (Ctrl +K) for you keystroke people. Once in Preferences, you will see a white box on the left side called Categories. In this box, you should scroll down until you see Units & Guides (near the bottom) and then click on Units & Guides. Within Units & Guides you will see three sections. In the middle section, Layout Grid, you will want to change the Subdivisions from 3 to 4. In this section you can also change several other features of the grid so please be sure that you do not change any of the other settings or you risk checking your margins incorrectly. If you happen to have trouble, reset your measurements so that they match the image below and you will be all set.
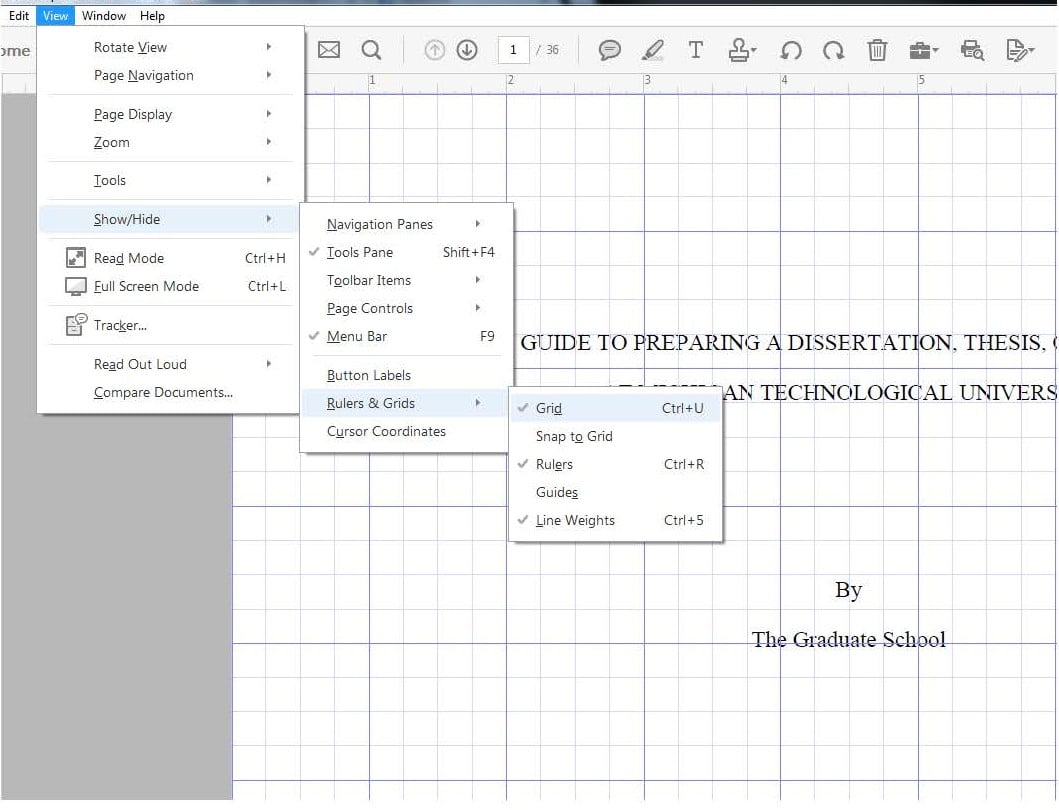
Adobe allows us to turn on both Grids and Rulers so that we can check our margins with ease. Once you have changed the Grid preferences as described above, you will next want to turn on the Grids. To do this, you will need to go to View> Show/Hide> Rulers & Grids> Grid. If you’re more of a keystroke person you can also use Ctrl+U to quickly turn grids on and off.
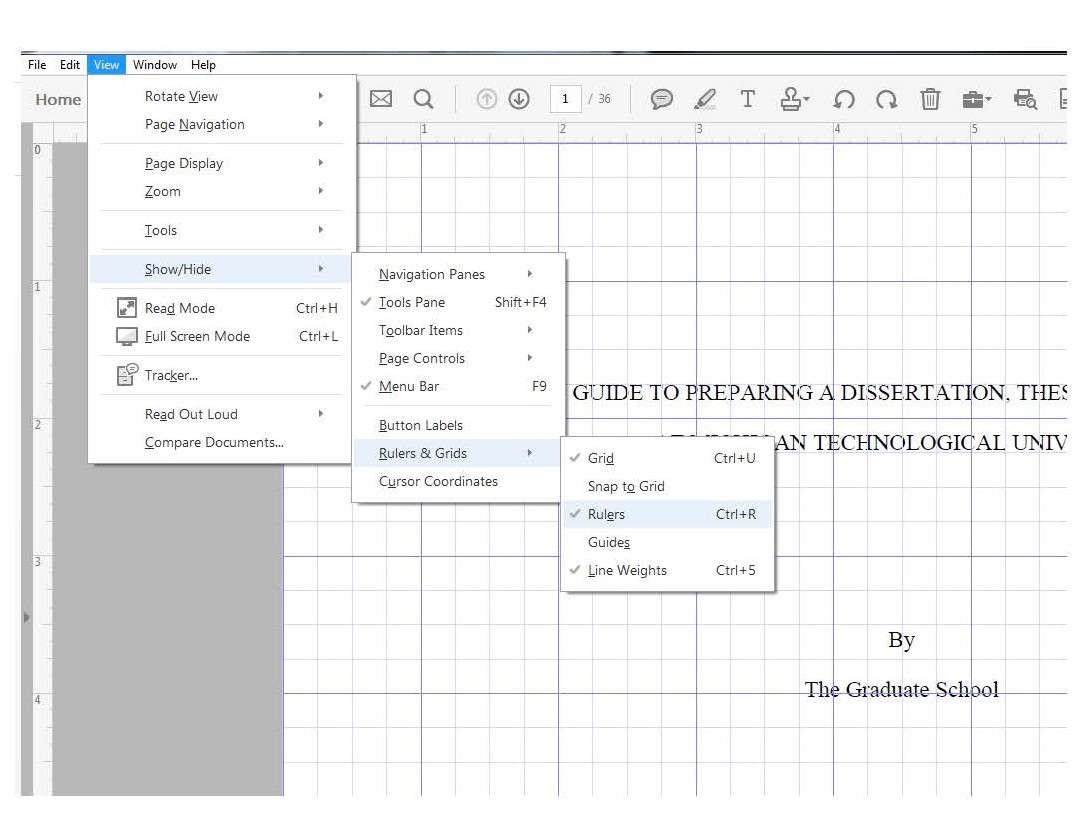
Once your grids are turned on you will also want to turn on Rulers. Turning Rulers on is much simpler than turning on Grids. For the keystroke crowd, simply use Ctrl +R. If you prefer to click, use the following path: View> Show/Hide> Rulers & Grids> Rulers. This is shown in the image below.
Checking Page Orientation
Once you have your Grids and Rulers turned on you will next want to check your page orientation. If you do not have any Landscape pages in your document, you may skip to the next section; Checking Your Margins. If you have Landscape pages you will need to rotate them 90 degrees counter clockwise before checking the margins. To do this, first click on the Rotate icon. This can be found in the “Quick Tools” bar at the top of your screen. If you do not see a Rotate icon, right click and choose “Customize Quick Tools.” When this dialog box opens, click on the “Organize Pages section(seen below) and choose the “Right” Rotate tool and then click on the small arrow on the right side of the box. Now Rotate should appear in your “Quick Tools.”

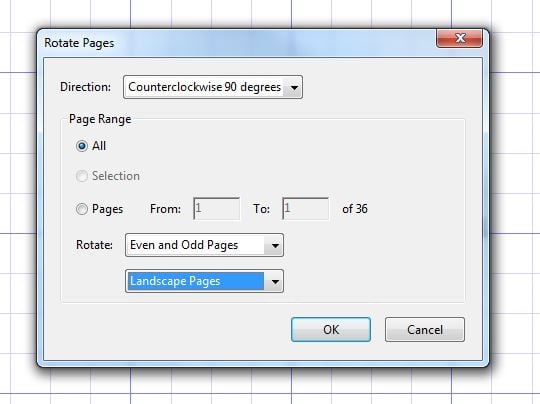
After you click on Rotate from your “Quick Tools” menu and the Rotate Pages box appears, choose “Counter Clockwise 90 degrees” in the Direction box. Under Page Range be sure to select “All”. Under Rotate, choose “Even and Odd Pages” in the top drop-down box and “Landscape Pages” in the second drop-down box. Before selecting OK, please be sure your box matches the image shown below.
Checking Your Margins
Now that you have turned on the Rulers and Grids and rotated any Landscape pages you may have you’re ready to check your margins. To do this, Zoom in to 125% and follow the instructions below.
Checking the Binding Edge Margin
As we mentioned previously (and you already know from reading Section 3.2 of The Guide) the rule for the Binding Edge (left) margin that it must be at least 1.5″ and not more than 1.6″. To check this, we recommend placing your cursor on the 1.5″ grid line and then proceeding to scroll (don’t cheat and use Page Down or you will miss stuff) through your document. If you have a lot of pages, this can be time consuming but it’s better to get it right the first time than to be scrambling to figure it out right before the deadline. When you’ve completed this, proceed to the Non-Binding Edge margins.
Checking the Non-Binding Edge Margins
The other three margins in your document (right, top and bottom) are all considered Non-Binding Edge margins. These must adhere to the guidelines of at least 1″ but no more than 1.25″ as per Section 3.2 of The Guide. To check the right margin, place your cursor on the 7.5″ grid line and scroll down. For the Top and Bottom margins, you should Zoom out to between 85% and 100% and scroll through your document making sure that there is nothing in the margins. One word of caution is to carefully check the location of your page numbers. These are the most common item that we find in the bottom and top margins when reviewing documents.
Wrapping Up
If you have successfully checked your margins and not found anything then your document is one step closer to being ready to submit. If you have any questions or we can be of further assistance, feel free to contact us at gradschool@mtu.edu or stop by our office on the 4th Floor of the Administration Building.