Author: Linda Wanless

Interpreting Course evaluations

Even as a new semester is starting, we should not lose sight of all the effort that went into teaching last semester.  The start of a new semester is a perfect time to reflect on your course evaluation results and the student feedback received.  

Previous course evaluations can provide valuable information and insight as you begin to take the time to reflect on where you would like to refine your courses in the new semester. But where do you begin to make sense of all the data and feedback that is provided on course evaluations? 

Starting Point

Select a recent course evaluation and run the report with comments.  At the top left corner of the report will be your response rates.  Do you have a good response rate to justify the value of the data?  If you have a very low response rate, you may want to be careful in making generalizations of the course overall. Be sure to use course evaluations that have at least a 50% response rate. For this reason, it is important to encourage students to complete the evaluations so that it will generate sufficient usable data later on. High response rates along with high scores also leads to teaching award nominations!!

Review the overall average of the 7 dimensions.  

The average of the 7 dimensions will be found towards the bottom of the report just under the likert scale questions.  Typically questions 5-11 are the seven dimension questions determined by the university.  Your average score on the 7 dimensions will depend on many variables such as class size, experience teaching this particular course, etc. If you would like to improve your overall average of the 7 dimensions, it is important that you look at each individual dimension and find the one with the lowest score.  This dimension would be your best indicator of a starting point in refining your course.  Going forward, you will want to select and  incorporate some different approaches or strategies that would hopefully strengthen this dimension from the student perspective.  

Student Feedback

Are you overwhelmed by reading through all the student comments at the bottom of your course evaluation reports?  Wondering where to start to incorporate this feedback into your future course offerings?  Begin by trying to categorize each comment into broader topics.  You will begin to see that most of the comments correlate with one of the 7 dimensions.  The category with the most comments will be an indicator of where to refine your approach moving into future offerings of this course.  

Feel free to reach out to the Jackson Center for Teaching and Learning – we have a wealth of strategies and approaches that you can try based on your course structure and comfort level.
Learning from each other-Peer Review Assignments

To strengthen students’ written work, instructors will spend a great deal of time providing detailed feedback in the hopes that students will apply the suggestions to their next written assignment. Unfortunately, many instructors feel that their efforts to provide feedback is being overlooked or not appreciated by the students.

What if an instructor could reduce the burden of providing all the detailed feedback YET increase students engagement in the review process? Maybe even strengthen their writing skills and assessment skills in the process…

Peer Review Assignments

Think about the possibility of having students review each others work and provide each other feedback. If you read through the body of literature, you will find many supporting arguments which state that peer review in the feedback process provides many benefits to students learning.

Benefits of Peer Review

  • Ability to become more aware of alternative perspectives on a topic.
  • Lifelong learning skills in how to effectively assess another person’s work.
  • Building self-assessment of their work by benchmarking themselves against their peers.
  • Critical thinking and diplomacy skills.

Canvas Peer Review Assignments

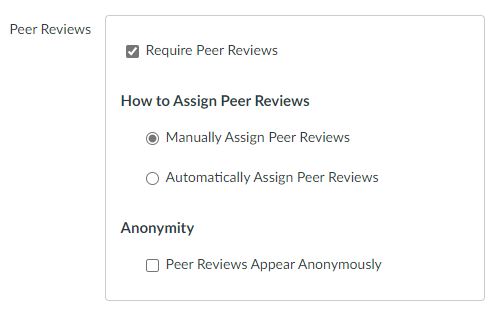
A Canvas Peer Review Assignment allows students to provide feedback on another student’s assignment submission. Setting up an assignment for peer review is fairly simple within Canvas. One of the options when setting up a new assignment is to designate it as a Peer Review assignment. You can select to manually or automatically assign the peer reviews. There is an option to set up the peer reviews to be anonymous or you can include a rubric for the reviewer to complete as the peer review. Peer reviews can not be used with External Tool Assignments.

Peer Review options in Assignments

Students will see a list of peer reviews assigned to them within the assignment. Based on how the assignment submission is designated, the student could annotate the document, add a comment in the comment field or complete the included rubric. A student reviewing another student’s assignment would need to leave at least one comment in order for the review to be considered complete.

Students will see their peers’ reviews in the right sidebar of the Canvas course under Recent Feedback. A student can simply click on the assignment title to access the feedback.

Video Assignments

Have you ever considered a different format for your assignments? How about having students create an explanatory video of how they analyze and stepped through a homework problem? Or it could be a short video of them applying a course concept in their daily life. Have you thought about offering a video assignments that involve opportunities to practice professional communication skills, project management skills or a practice presentation. Did you know that students can provide a video response to a discussion thread?

Benefits of video assignments

There are many ways to incorporate a video assignment/response into your course content but you may be wondering what benefit(s) does a video assignment provide over the previous written assignment you had originally assigned? The most significant benefit noted by researchers is that students find video assignments to be more beneficial to their own understanding and mastery of the content. By creating a video, it provides students with an opportunities to practice and demonstrate course concepts. This often involves writing out a script, practicing their response or gaining additional information on the topic before creating the video.

Creating a video assignment in Canvas

You will want to begin by creating a Huskycast student assignment folder. Creating this folder will give students access to record and upload video. Once that is complete, you can now go ahead and create the Canvas Video Assignment. Since students may not be familiar with how to create or upload a video assignment in Canvas, you will want to be sure to provide some guidelines on submitting a video assignment.

After students have submitted their video assignment, the instructor can navigate to the assignment in Canvas and click on Speedgrader. Each submitted video will be embedded on the student’s Speedgrader page. The instructor can review the video, add comments and a score.

Other video response opportunities

You may also want to consider other opportunities for a student to provide a short media response. Maybe there is an opportunity in a discussion or an announcement for a student to provide a short media response.? The Rich Content Editor (available on Announcements, Assignments, Discussions, Pages and Quizzes) allows students to record or upload a short video and/or audio media. Video and audio uploads to Canvas can be up to 500 MB. Media recording submissions are not downloadable.

Upload/Record Media

Additional guidance on video assignments

Not sure where to start with incorporating videos assignments into your course content? Or maybe you have some questions about setting up the assignments….if so, feel free to reach out to elearning@mtu.edu or contact the CTL at 7-3000.

7 Dimensions of course evaluations

The course evaluation survey is comprised of 7 main questions most commonly known as the 7 dimensions. These 7 dimensions provide students with guided questions in evaluating the teaching and learning process of a course.

As another fall semester begins again, it is often a good time to reflect on these dimensions by reviewing previous course evaluation scores and student feedback in order to seek ways to be continuously improving your courses.

It may be helpful to outline each dimension with some possible classroom strategies that could be incorporated. To get you started, we have outlined each dimension along with one or two strategies you may find useful for each.

  • The instructor was enthusiastic about the subject matter of the course.
    • Share your passion for the topic by incorporating your work experiences, research findings and publication work into your lectures.
  • The instructor communicated the course material clearly.
    • Set up course content in organized modules by weeks, chapters or units within Canvas.
  • The instructor engaged students by encouraging participation during class.
    • Chunk your lectures into 10-15 min. segments. Have students interact with the content for the next 10 mins. before returning to another segment of your lecture. Reference the CTL website for additional active learning strategies.
  • The instructor engaged students by encouraging course preparation, reflection, or other activities outside of class.
    • Offer homework or pre-class activities that allow students to apply the concepts to their current real world situations.
    • Offer social media or collaborative platforms such as google docs in order to share their files with peers and work in real time.
  • The instructor provided timely feedback on my work (homework, assignments, exams, etc.)
    • Utilize grading tools such as Gradescope that allow you to pre-populate your feedback based on student responses.
  • The instructor displayed a personal interest in students and their learning.
    • Provide timely feedback.
    • Try to arrive early to class and stay a few minutes after (if room schedule allows) to have informal conversations with students.
  • The instructor uses technology appropriately.
    • Introduce one or two technologies that complement your lectures. For example, try a digital interactive whiteboard such as jamboard.
    • Engage students with polling questions via iClicker.

Taking time to reflect and plan strategies for each of these dimensions at the beginning of the semester will be beneficial at the end of the semester as students evaluate these seven dimensions and provide feedback on what worked well. If you would like to discuss the Student rating of instruction in more detail, please feel free to reach out to the CTL at 487-3000.

Video Assignments

Have you ever considered a different format for your assignments? How about having students create an explanatory video of how they analyze and stepped through a homework problem? Or it could be a short video of them applying a course concept in their daily life. You may also want to pursue video assignments that involve opportunities to practice professional communication skills, project management skills or a practice presentation. Ever consider allowing students to provide a video response to a discussion thread?

Benefits of video assignments

There are many ways to incorporate a video assignment/response into your course content but you may be wondering what benefit(s) does a video assignment provide over the previous written assignment you had originally assigned.? The most significant benefit noted by researchers is that students find video assignments to be more beneficial to their own understanding and mastery of the content. By creating a video, it provides students with an opportunities to practice and demonstrate course concepts. This often involves writing out a script, practicing their response or gaining additional information on the topic before creating the video.

Creating a video assignment in Canvas

You will want to begin by creating a Huskycast student assignment folder. Creating this folder will give students access to record and upload video. Once that is complete, you can now go ahead and create the Canvas Video Assignment. Since students may not be familiar with how to create or upload a video assignment in Canvas, you will want to be sure to provide some guidelines on submitting a video assignment.

After students have submitted their video assignment, the instructor can navigate to the assignment in Canvas and click on Speedgrader. Each submitted video will be embedded on the student’s Speedgrader page. The instructor can review the video, add comments and a score.

Other video response opportunities

You may also want to consider other opportunities for a student to provide a short media response. Is there an opportunity in a discussion or an announcement for a student to provide a short media response.? The Rich Content Editor (available on Announcements, Assignments, Discussions, Pages and Quizzes) allows students to record or upload a short video and/or audio media. Video and audio uploads to Canvas can be up to 500 MB. Media recording submissions are not downloadable.

Upload/Record Media

Additional guidance on video assignments

Not sure where to start with incorporating videos assignments into your course content? Or maybe you have some questions about setting up the assignments….if so, feel free to reach out to elearning@mtu.edu or contact the CTL at 7-3000.

Gathering course feedback

A good time to evaluate how your course is doing is in the fourth or fifth week of the semester. Both the Provost and the University Senate (Policy 505.1) advocate for distributing an Early Term Survey. The Early Term Survey provides students with a formal mechanism to give constructive feedback early in the teaching term. Feedback identifies for the instructor ways that the course can be improved moving forward. Examples of a course improvement might include additional study materials or varied methods for a classroom presentation.

Early Term Survey provided in Canvas courses

It is recommended that the Early Term Survey contain three standard questions as outlined in the Policy 505.1 details. To save faculty time in creating a survey each semester, an Early Term Survey is pre-loaded into each Canvas course at the beginning of the semester. The Early Term Survey is located under the Surveys module. The survey is pre-populated with the three standard questions (as outlined in the Senate Policy) and is designated as ungraded and anonymous.

Example Early Term Survey in Canvas

Instructors can add additional questions to the survey if they would like. Our Knowledge Base article entitled, “Adding Questions to the Early Term Survey” will provide you with the details. Remember to publish the survey when it is ready!

Early Term Survey Results

After students have had some time to complete the survey, the instructor can view the results in a couple of different ways. You can view the survey results and the individual responses by selecting Show Student Survey results located within the survey. Or you can select the Survey Statistics in the right sidebar of the survey. The Student Analysis option (within survey statistics) will allow you to download a CSV file containing all responses received from the students.

Implementing student feedback

It is essential that you summarize and respond to the feedback provided.  This can be done briefly in class or even by e-mail a day or two after the survey closes.  Above all, it is especially important to respond to anything you hear multiple times.  If you are unable to make suggested changes, tell students why.  It’s important to show you’ve considered their feedback and are thoughtful about the organization of your course.  Also, if you can act on their suggestions, let them know how you plan to adapt and why you’re making the change.

Additional Support

If you have further questions about administering the Early Term Survey or would like to discuss ways that you can successfully apply the feedback to your course, feel free to reach out to the Jackson Center for Teaching and Learning at 487-3000 or email us at elearning@mtu.edu.

iClicker and student engagement

As we return to in-person learning, many faculty are pursuing ways in which they can engage students in the learning process. One effective approach is to poll students during a live classroom session. A short poll midway through a lecture allows the instructor to gauge comprehension of course content or receive student input. Michigan Tech currently supports iClicker Cloud software to conduct polling in an effort to increase student engagement. The software allows instructors to summarize, share and react to student responses. Points can be applied based on participation or correct answer responses. Students can participate in the polling sessions by using their mobile device or laptop.

Getting Started

Are you interested in polling your classes but not sure where to start with using iClicker? You can get started by downloading the iClicker Cloud software and establishing a free instructor account and creating an iClicker course. I would also encourage you to review the CTL webpage for more info on Student Polling.

Now that you have downloaded the software and established your iClicker course, the next step would be to pull your Canvas course roster into iClicker Cloud as well as become familiar with how to sync your iClicker Cloud grades to your Canvas gradebook. You can reference the iClicker Instructor Guide for further details. Linked below is a great video that summarizes the entire process from downloading the software to running a classroom poll to how students respond on their devices.

Overview of iClicker Cloud and polling

Play 2021 iClicker Cloud Full Training video
Preview image for 2021 iClicker Cloud Full Training video

2021 iClicker Cloud Full Training

iClicker question types

If your students are using the iClicker Student app on a mobile device or laptop to respond, you have a great deal of freedom in the types of questions that you are able to ask. iClicker offers multiple choice, short answer, numeric and target type questions. You may want to review our previous blog post on iClicker Question Types for more details. If you have students who are still using the physical iClicker device, you will want to limit your question type to only multiple choice.

Taking iClicker to the next level!

Interested in using iClicker beyond just classroom polling? iClicker recently introduced the iClicker Assignment feature. The Assignment feature allows instructors to upload pre-authored questions on the iClicker Cloud instructor website. Students are able to respond to Assignments in the iClicker Student App at their own pace. iClicker has a wealth of great Knowledge Base articles on Assignments and best practices to incorporate them into your courses.

Reach out to us!

If you are interested in finding out more about using iClicker in your classroom or have questions about setting up the iClicker cloud account, feel free to reach out to us at elearning@mtu.edu.

Need help grading?

Are you teaching a large class section this semester and feeling overwhelmed by all the assignment submissions that need grading? MichiganTech has recently added Gradescope to its list of university-supported EdTech Tools. Gradescope is an AI-assisted grading tool. It is designed to help the instructor efficiently grade assessments while still providing detailed feedback. Gradescope can support variable-length assignments such as homework problems as well as fixed-template assignments such as worksheets and exams. Gradescope easily links with Canvas allowing you to set up Gradescope assignments that students can access via your Canvas course. The scores from Gradescope assignments can sync to your Canvas gradebook. Instructors have commented that Gradescope has cut their grading time in half!

Interested in getting started? Follow this KnowledgeBase article that will provide guidance on logging into Gradescope and setting up a Gradescope course.

Photo courtesy of Pexels.com (Lum3n)

Gradescope Assignment Types

So, now that you have logged into Gradescope and set up a new course, lets take a look at the various assignment types that can be created in Gradescope:

Homework & Problem Sets — supports variable length assignments such as handwritten homework problems. It is designed to allow the students to submit their work to Gradescope. Our Gradescope – Homework & Problem Sets article provides additional details to assist you in setting up this type of assignment.

Exams & Quizzes – this assignment type allows the instructor to upload the blank copy of the exam and create an outline that defines the details of the exam such as question regions and question point values. The completed student exams would be collected by the instructor and scanned into Gradescope for grading. Our Gradescope-Exams & Quizzes article goes into further detail.

Programming Assignments – This assignment type allows students to submit code projects which can be automatically graded with a custom written autograder or (if you prefer) you can manually grade the code project using the traditional gradescope interface. You will want to reference our Gradescope – Programming Assignment article for information on how to set up the autograder feature.

Linking your Canvas course to Gradescope

Once you have your Gradescope course and assignments defined, you will need to be sure to link your Canvas course with your Gradescope course and sync your roster so that grades from assignments can be pulled into your Canvas gradebook.

Grading Assignments

We have finally reached the point where you can see the benefits of Gradescope — the grading of the submissions! Once the submissions are scanned in by the instructor or submitted by the student, you are ready to grade by applying the appropriate points and comments to the submissions. Before you get started on grading that first stack of assignments, you may want to reference Gradescope’s tutorial on this process.

Follow up with us!

If you would like to discuss Gradescope in more detail or just want to let us know how Gradescope is working for you….please reach out to us at elearning@mtu.edu or call 7-3000.

Starting the semester!

Image courtesy of Pexel.com ( Tiachard Kuntanom)

With the start of another semester underway, you are probably busy getting your courses set up in Canvas, recording your introductory video in Panopto-Huskycast or figuring out how best to incorporate iClicker, Turnitin or Gradescope into your courses. Has it been some time since you used these tools?… (or maybe you never have!) and you have several questions about set up. Well, you are in luck, this blog post will link you with some great previous posts and resources to get you back up to speed on the educational technology supported by Michigan Tech.

I would like to begin by referencing a great blog post we did (not that long ago) where we compiled all the support resources for EdTech Tools into one table. Check it out! It should save you some time searching around for answers to those questions that you only seem to ask yourself at the start of each semester.

Michigan Tech Basic Teaching Tools Course

Are you new to teaching or in need of a refresher on the basics of Canvas, Panopto-Huskycast or Zoom? Curious to find out more about iClicker, Turnitin or Respondus Lockdown Browser? The CTL recently launched a new self-paced course intended to strengthen your knowledge of the three most frequently used blended course delivery tools (Canvas, Panopto-Huskycast and Zoom) along with several other tools we support. You can self-enroll in the course with this link to the Michigan Tech Basic Teaching Tools Course. You are welcome to work through only the modules that interest you or the entire course! The CTL is also offering a 30 min. consultation at the end of the course to follow up with a course facilitator on any additional questions you may have.

Moving beyond the basics

Are you already savvy in Canvas, iClicker or Huskycast and want to know if there are any unique new features that have recently been added? Great news from Canvas for instructors who would like to be able to hand back an assignment to a student and allow them to revise their work and resubmit. The feature is known as Submission Reassignment and it basically allows the instructor to reassign an assignment (with a due date) back to an individual student and ask them to redo their submission. Our blog post this past spring entitled, “Speedgraders latest feature!” outlines the details.

Are you using iClicker and wish you could take it beyond the classroom? Be sure to check out this blog post on the Assignment feature in iClicker.

If you are busy using Panopto-Huskycast to record great videos within your classroom, office or lab setting for your students, I would recommend you check out our post about the Three Huskycast features you should know about. There are some great details in this post on how to set up a video assignment or embedded quizzes.

Reach out to us!

If you still have some unanswered questions about the EdTech tools that Michigan Tech supports, feel free to reach out to us at elearning@mtu.edu or 487-3000. Have a great semester!

Grammar checking available in Turnitin

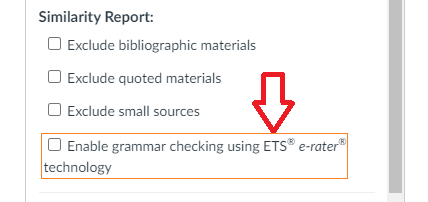
If you regularly use Turnitin to check students’ written work, you may have recently noticed an additional item in the list of Similarity Report options, as you set up a Turnitin Assignment within Canvas. This option is “Enable grammar checking using ETS e-rater technology“.

Similarity Report options

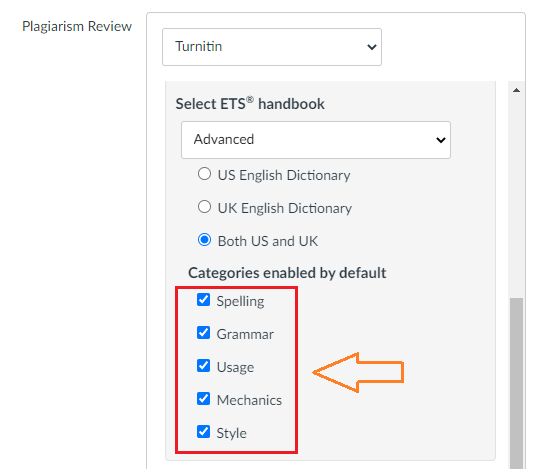
Enabling the grammar check on a Turnitin Assignment will allow student submissions to receive detailed grammar feedback generated automatically through e-rater technology developed by ETS. This technology can automatically check and markup submissions for grammar, usage, mechanics, style and spelling errors while also providing in-depth feedback. When an instructor sets up a Turnitin assignment they can select which of the above categories are enabled by default.

Category options

Viewing the Grammar checking results (e-rater marks)

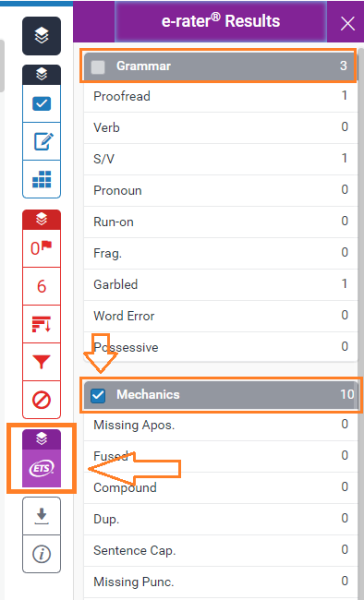
For a student to see the results of the grammar check on their submission, the instructor should be sure that the e-rater results are visible. You can hover over the ‘stack of papers‘ icon (just above the ETS symbol) on the similarity report to determine if the grammar results are visible or not to the students. If the icon is highlighted to show the results, be sure to verify that the category choices are also selected within the e-rater side panel. To access the e-rater Results side panel, click on the purple ETS symbol.

e-rater icon on the Similarity Report

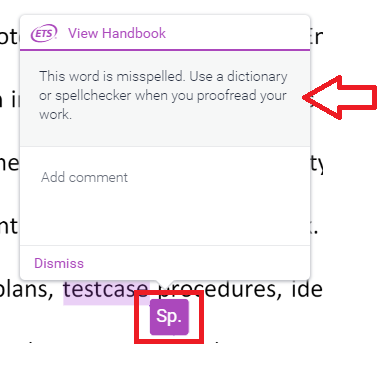
Here is an example of what an e-rater mark and feedback looks like within the submitted student document. The e-rater feedback also provides space for you to add a comment. Once you have written your comment, simply click anywhere outside of the text box to save the comment.

e-rater mark and feedback

So, next time you set up a Turnitin assignment, you may want to consider including the grammar check option in the Similarity Report. The automated system saves you time from having to annotate the document while still providing great feedback to your students about grammar and mechanics.

If you would like to discuss Turnitin or the e-rater feature of Turnitin in greater detail, feel free to contact the elearning team at elearning@mtu.edu.