You can customize the contact information that appears in the footer of your website. At a minimum, all websites are required to have a name that is linked and at least one form of contact—either a phone number or email address. This is only available in the _props.pcf file within the root folder for your site or the folder where navigation is restarted.

- Open the _props.pcf file in the root folder for your site.
- Go to Properties in the Page Actions Toolbar.
- Be sure you have the file checked out (if not, click on the lightbulb icon in the Page Actions Toolbar).
- From the Parameters menu on the left, find the “Site Footer Contact Information” section.
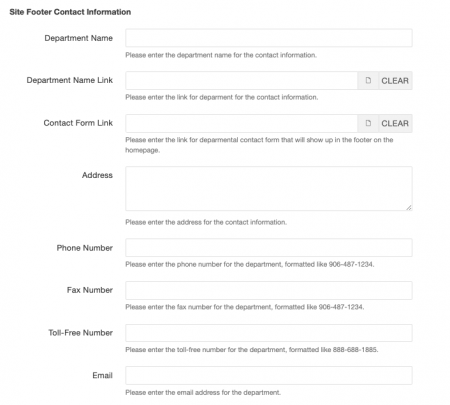
- Department Name: First line of the contact information.
- Department Name Link: Use the file picker icon next to the field to select a CMS page that will be linked to when a user clicks the Department Name.
- Contact Form Link: Use the file picker icon next to the field to select a page that contains additional contact information or a contact us form. If a page is selected here, the site will link to this page when the user clicks the Department Name from the homepage and will link to the Department Name Link from other pages in the site.
- Address: Enter the department’s address information. Text will automatically wrap when it gets too long.
- Phone Number: Enter the department’s phone number, including area code, using hyphens (-). This will automatically include “Ph:” on the live site.
- Fax Number: Enter the department’s fax number, including area code, using hyphens (-). This will automatically include “Fax:” on the live site.
- Toll-Free Number: Enter the department’s toll-free number, including area code, using hyphens (-). This will automatically include “Toll-Free:” on the live site.
- Email: Enter the department’s email address, including @mtu.edu. This will automatically include “Email:” on the live site.
- Click the Save button.
- Publish.
Play Site Footer Contact Information video
