Tag: Lean Tools

Wedding Bells Are No Exception

So often we get caught up in our projects: we start them, prioritize them, and then devote all of our attention to them one by one until they’re completed. We very rarely have a single project that is on-going for a long period of time; why is this?

I think it’s because we don’t want lingering work, we thrive off of completion. From that we gain satisfaction and pride in our work.

There is, however, a trade-off for this pride. That is, when we continuously move from one project to the next, seeing each to completion before starting the next, most of us quickly become burned out. When we get burned out we lose our energy and our enthusiasm, as well as become negative, frustrated, and unproductive. That satisfaction we were chasing before no longer sustains us.

Back in February, one of my co-worker’s blogged on incremental improvement, and recently she blogged about Preemptive Improvement. In these blogs, she’s shared how our office has been using small improvements to achieve a high future state and strive for perfection, even when a correction isn’t necessary. These methods are some that I’ve been applying in my own personal life heavily in the last year or so.

Last July I got engaged, we set a date 11 months out and so commenced the wedding planning. For all those who’ve been married, you probably know the magnitude of this task. I’ve always been a “planner,” per say, and I tend to enjoy getting to use my creativity, so from the beginning I’ve been pretty excited about the planning process. However, I know a lot of people who’ve gotten married and I’ve learned that the entire process isn’t always fun, or creative. I also know myself and I tend to go and go and go, and focus on one thing until it’s complete before I’ll start the next; meaning, I tend to burn myself out.

Knowing the planning wouldn’t always play on my interests, and knowing that I sometimes overburden myself were good things to be aware of back in July. Because of this, I was able to plan ahead and use my lean thinking skills to combat potential burnouts or becoming a bridezilla (my worst nightmare). I did this by utilizing the skills I’ve learned here in the Office of Continuous Improvement. I can honestly, say with 10 days left until the wedding, that I’ve only had two “burnouts,” one as a result of over-processing, and the other was out of my control to change.

After talking to multiple soon-to-be wives, I’ve learned that I am the one who’s been the least bit stressed about the planning process as a whole and I believe this is from all of the lean I’ve implemented… From organizing my thoughts via a gigantic affinity diagram, laying out the roles and responsibilities of our family members in a swim lane, using a decision matrix to decide on venues and vendors, ICE prioritization of tasks, plentiful checklists, recognizing when I was over processing, and also taking it one step at a time and remembering that the entire wedding doesn’t need to be planned over-night.

I’ve also gathered that on average, the last three weeks before the wedding tend to be the busiest with wrapping up small details. However, because of the prioritization that we conducted early on, and the small deadlines we set, we were able to spend two of those weeks towards something not related to wedding, and only spend the last week wrapping up details.
34643065_10204681238907051_8619962606741880832_n (1)
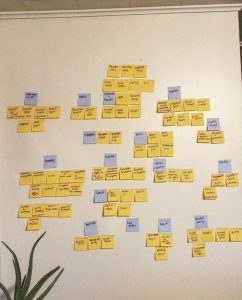
This is the original affinity diagram that kicked off the planning (kind of) last August. Things would get added and removed as we moved, but at one point it took up this entire 10 ft wall.

The purpose of today’s blog post is to show you that as long as you learn how to slow down your thinking, anyone can implement and benefit from small improvements striving for perfection.


Taking the Plunge into 5S

For some people accomplishment comes from the words, “our work here is done,” however, I believe that accomplishment can also come from, “we’ve only just begun.”

As we’ve shared in the past, each year 15-18 Michigan Tech faculty and staff come together in hopes of becoming the newest additions to our facilitator co-hort here on campus. To achieve the title of a “Level 1 Facilitator,” each candidate must attend seven days of training, complete various homework assignments, and participate as either a team leader or a facilitator on a new kaizen with three to four other candidates.

The group I’ve been assigned to has decided that their kaizen was going to be to 5S the Foundry Lab located in the Material Science and Engineering building. A couple of weeks ago, four future graduates, and an already seasoned facilitator, went to the gemba, where work is done. Our tour of the Foundry Lab consisted of Team Leader, Matthew Otte (Material Science and Engineering) walking us through the various workstations and processes for every corner of the lab. Our walk took a little over an hour and a half, and we really only scraped the surface for potential areas of improvement.

Before
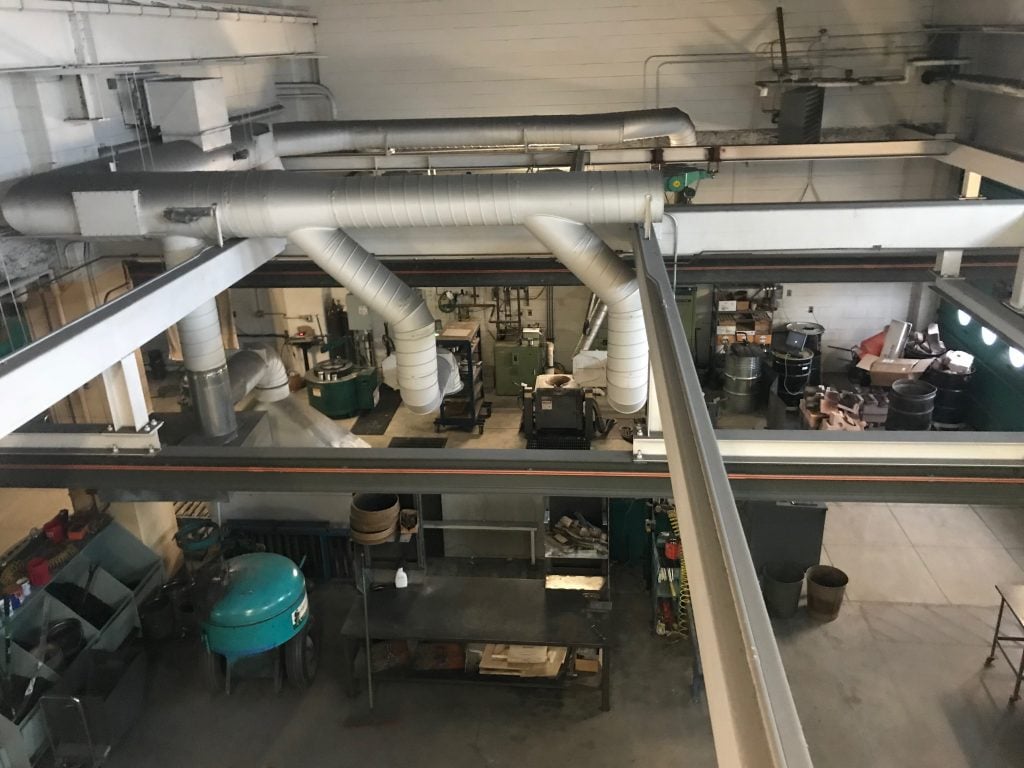
This is the top view of the Foundry lab before any changes have been made.

Following this Gemba walk I found myself a little overwhelmed by the magnitude of potential within the lab. I was struggling with imagining where, how and when to start.

One of my favorite things about lean is that it has taught me to become an independent problem solver. When this overwhelming feeling creeped in I remembered that the most important thing with any change is to just start. There’s no rule that says you must jump from current state to ideal state in one step. Continuous Improvement is about incremental changes. It doesn’t matter how big the stride, what matters is the direction.

Considering this, the team and I regrouped, and we decided to start with one single workbench and slowly pick away at other areas within the Foundry.

Before finishing station
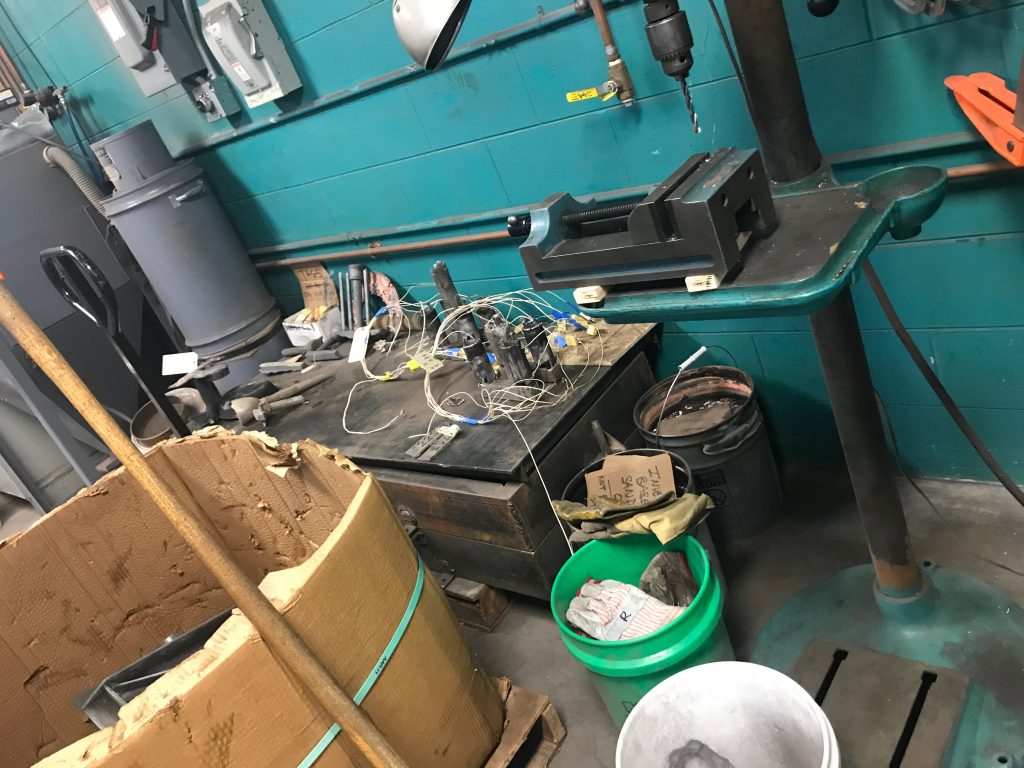
This is a before picture of the finishing station workbench our team decided to start with.

Now, these emotions I experienced weren’t necessarily circumstantial, however they’ve been encountered many times by many people and seem to be associated with any sort of change. Commonly, this sense of being overwhelmed is coupled with 5S. I’ve found that in most cases, when 5S is initiated, there’s usually a lot that needs to be done.  These emotions can be used as a trigger to take a deep breath, and pick one incremental change at a time.

Lean: Past, Present, and Future

Beginning my learning in the Office of Continuous Improvement, not only did I learn what Lean itself was and what it looked like, but also I began to recognize where it is applicable. (The last part of that sentence is an oxymoron, as Lean is applicable literally everywhere). However, I began thinking about and applying Lean to circumstances from my past, starting to apply it in everything I do now, and applying it in the future.

Before working in the Office of Continuous Improvement here at Michigan Tech, my place of employment was absolutely awful, pretty much to the point of unbearable. For those of us who know what it is like to work at a job that gives absolutely no satisfaction in any shape other than being un-employed, then you know just how depressed it makes you. After being inducted into the Lean culture and environment, I cannot help but to mentally think about how much that company could truly grow and prosper if Lean was truly and wholeheartedly applied. I dream of how the 5 Whys and Swim Lanes and other useful tools of Lean could benefit the company and employees there, and the many problems that never go away. The kinds of issues that myself and others continue to deal with are ones that are chronic; not only in terms of the process, but that there is also an entire lack of safety as well as lack of respect between employees and managers of the company. Those who understand the culture of Lean understand that this is a huge issue, in that the two most basic pillars of Lean are lacking, which cripples any sort of progress or improvement trying to be made. To say that I am much more happy and satisfied in my work now is an understatement, but I do hope that my old work-place embraces Lean for the better, for the sake of those who continue to work there. Looking back at the two different work environments, and the two different attitudes that I attend work with each day, I can already personally see the difference Lean has made in my life.

Once learning about Lean, I began applying it immediately to my every-day schedule. Not only because I would have to be familiar with Lean tools at work, but also because they are good tools to use anywhere and the more familiar I am in applying them, the better. Thinking Lean is not a mindset that is only adopted in certain situations, but it is a mindset that you continue to use and apply all day, everyday. I can personally say, the transition to the Lean mindset was extremely easy and beneficial. Everyday, I find something I can improve on, and I try to take one more Lean step forward.

In terms of the future, I already have a head-start, thanks to the implementations I have made with Lean thus far. However, this does not mean my Lean journey is done, in fact it is far from being over. One of the best parts about Lean is that there is no limits to its application, the possibilities are truly endless. Endless! As said by Maria Calcagni  in “Gemba Kaizen”, by author Masaaki Imai,  “It is not the idea that something is wrong, but that it can be better”(pg 96). There is always room for improvement, always some process in life that can be made more efficient or effective.

And so, I will take my Lean journey and think of how it would have helped my past, allowing me to know where to start applying it in the present, and continue to let Lean guide me through the future.

Lean at Girl Scout Camp

Time and time again I am amazed by the flexibility of lean and its endless applications outside of the office. It seems that no matter what sort of process I have going I can always improve it in some way. Whether it be how often I perform regular maintenance on my car, how I stock my pantry, or how I prioritize my chores for the evening. The most adaptable part of lean is the use of people. Not a single aspect of lean was designed for one person and one person alone to complete a task, but rather to be easily used in a team.

Being a college student there are many times that you get put into a group of total strangers and you are expected to get the task done. However, each member goes into the group with a different set of priorities, expectations, and values that they carry with them- whether they know it or not. This is true going into a marriage, a summer camp, a new job, or even something as simple as a group project for school. The question I began to ask was, “How can you accommodate the different values and expectations before a diverging trait breaks lose?” and, “How can you have a plan for when disagreement arises?” The answer is by implementing a team charter.

What is a team charter? A team charter is developed in a group setting to clarify the teams direction while establishing boundaries, it is used to encourage a common understanding and shared voice among all group members.

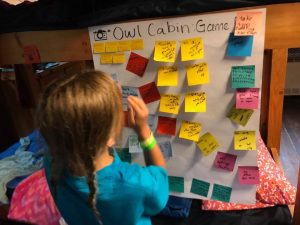
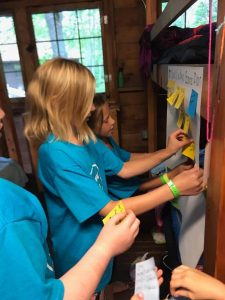
I recently had the opportunity to practice a team charter in a unique setting with nine 9-11 year old girls in my cabin at girl scout camp. This charter was developed by the girls in my cabin on how we planned to take care of cabin, how we were going to treat each other, and how we were going to treat ourselves. To make sure that all of their voices were heard without making these preteens uncomfortable, I opted to use an affinity diagram with them. We took a few minutes to make three affinity diagrams (one at a time), after this we collaborated, laughed, and successfully agreed on our game plan.

Affinity
One of the older girls working on her sticky notes. This one puts lots of thought and effort into her ideas. It was fun to watch her become so invested in the cabin.
affinity 4
One of the girls thinking about the ideas and helping everyone to brainstorm categories.
affinity 2
The girls working together to group their ideas.
affinity 3
Finally some rearranging and getting close to the end.

Sadly, I don’t have an after picture of what we came up with, I was a little too excited that the idea even came together in the first place (In my time as a counselor I have learned that you never know what the middle school girls are going to bring). However, the game plan we formed was visible all week long and in several instances I noticed the girls taking a look at it, holding one another accountable to it, and sometimes asking for buy in to add a few more items to our plan. All in all it was a great week, and I was thrilled once again with the malleability of lean.

Root Cause Analysis- Saving the fish

A few weeks ago, I learned the importance of Root Cause Analysis and the difference a few LEAN tools can make. Unfortunately I had to learn this lesson the hard way.

My room is filled with fish. Between my roommates and I, we take care of  four Betta fish, two feeder fish, and a goldfish. I can admit that it is a lot of work. One night  I noticed a problem with one of our Bettas, Haru. Haru had gone from his usual energetic self, to sitting on the bottom of the tank and I hadn’t a clue as to why.  Immediately I jumped into action, trying everything I could to make the little guy feel better.  I tried everything, heating his tank, cleaning his water, even an extra snack for the night.  The next morning, Haru seemed worse.  Within two days, we had lost Haru to whatever had made him sick.  I tried everything to save the little guy, except applying my LEAN thinking.
After loosing Haru, I decided to learn from my mistakes.  My biggest mistake of treating Haru was that I hadn’t preformed any form of Root Cause Analysis.   The problem with ignoring Root Cause Analysis is that I only treated the symptoms, and I never treated the source of the symptoms. The trick to lean is that you have to find the problem in order to fix the problem.

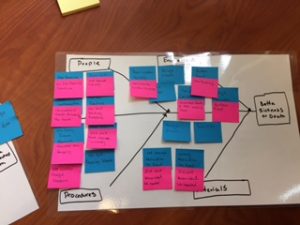
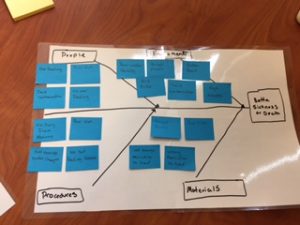
I decided to use a Fishbone Diagram to try and determine the cause of Haru’s Sickness.  To start the Fishbone Diagram, my roommate and I brainstormed everything we could think of that might have caused Haru’s sickness.  Modifying the Diagram slightly for our fish tanks, we separated these problems into categories.  We decided to group them by, problems with materials, problems in his environment, problems with the way people interact with the fish, and procedures in place for the fish routine and maintenance. Once we had our diagram set out, we started asking why. For each problem we listed, we first determined if the problem existed in our tank systems.  Then We used the 5 whys to find the cause of each problem.  After all of our analysis, we determined that Haru’s sickness was caused by poor water quality.  The water quality was a result of over feeding, or contamination of the tanks.  The overfeeding was a result of a lack of feeding schedule.  The fish were being double fed because we didn’t know that the other room mate had already fed them.  The contamination was caused by miscommunication to guests. we never made it quite clear who, or what could touch each fish’s tank. Once we knew the root cause, we were able to fix the problem. By posting a feeding schedule and rules for the tanks we have been able keep all of our other fish happy and healthy.
In the world of problem solving, root cause analysis is easy to forget. It can become a habit to treat the symptoms without ever discovering the real problem. As with our Haru,  treating the symptoms can have disastrous consequences. As I continue learning and using LEAN, I will have to remember, You have to find the problem to fix the problem.

Asking why
The pink notes helped us to visualize the answers to some of our Whys.
Finding the possible problems
The blue notes were all of the possible causes of Betta sickness.

Lean Olympics Take on the SWIM LANES

With the Rio 2016 Summer Olympics among us and being proud Americans, you probably can’t even go to the grocery store without something or someone blaring “USA! USA! USA!” amid chanting crowds. Can you blame us? We’re up to 83 medals in two weeks, and Hello! Katie Ledecky! Breaking a world record while winning a gold medal by *cough* ONLY 11.38 seconds! That’s pretty cool and yes, GO USA! However, moving passed the idea of the stripes and stars, I’m more interested in the arena Katie took her gold in, and that was in a swimming pool-the kind with swim lanes.

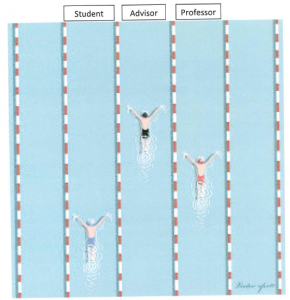
Swim lanes are a tool that is depicted through a diagram. How this tool works is to show the flow of a process or the crossing of many areas of a process and doing so visually. To aid in understanding the steps, an example represented by the progression of the tool will be shown below with a description of each step. This example shows a student who needs to get into a class that has already reached it’s maximum capacity and can’t register for it so they request an exception.

How a swim lane is kicked off is through identifying who touches the process. This “who” can be an individual, a group, a department, an object, or basically anything that physically touches the process. For our example, the who’s include the student, academic advisor of the student, and the professor of the class being registered.

swimlane1

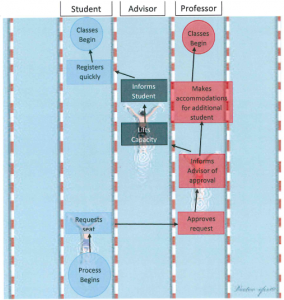
Once the “who’s” are identified, the what’s need to be added. These “what’s” are the current processes that each “who” goes through and how each others processes relate to one another. This is also where you identify where each “who’s” process starts. The process for our example starts with the student and moves to the professor then to the advisor and back to the student.

swimlane2

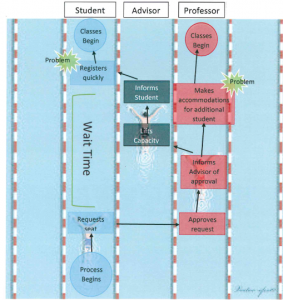
The third step is where the “what” is examined and analyzed for where there is waste within the process or steps and that don’t add value. For our diagram, there is a waste of time between the time the student makes the request and actually hears back that they can register. This is a waste because it is waiting time. There is also waste for the student: once they are able to register they have to do it very quickly so that another student doesn’t register when they see an open or an “extra” seat. There’s also waste for the professor: they need to do re-work of their classroom to be able to accommodate an additional student.

swimlane3

Through the use of swim lanes you are made to focus on the basic steps to figure out what is actually happening in a process, and once that is done, you are able to then dive into the process and figure out where the defected or problematic areas are and can then get to the root cause. This aids you in being able to see the big picture. Often times we have a process that is “broken” and we become frustrated and redo the entire process just to find that it didn’t reduce the frustration. However, through the use of swim lanes you are able to see the whole process and establish what part(s) of the process is/are broken and can devote your time and energy into making improvements to that specific area without redoing the whole thing. So just like Katie Ledecky, if we take one [free-style] stroke at a time, we can come out in record time.

“ExperienceChange” Simulation

I recently had the opportunity to participate in the change management simulation known as ExperienceChange. This opportunity was presented through a course I’m taking with Professor Latha Poonamallee on change management. The course, MGT 4500: Managing Change in Organizations, is primarily an experiential learning class that focuses on “developing an understanding of the complexity and dynamics of change in complex organizations.”

The simulation involves two scenarios that require learners to use the fundamental change management theory as the basic framework to guide themselves through a fictitious simulation in assessing and understanding different change tactics. This framework guides the user through a seven step process of gathering buy-in for a Lean transformation:

  1. Understand
  2. Enlist
  3. Envisage
  4. Motivate
  5. Communicate
  6. Act
  7. Consolidate

This was a great experience for me as a Lean practitioner to increase my knowledge and understanding of how to effectively implement organizational change. For anyone who is preparing to go through a change, I highly recommend the ExperienceChange simulation. This training tool can definitely help maximize the chances of your workforce making a smooth transition from “the way we’ve always done it” to the “new” way.

The Perfect Cup of Joe

We are pleased to present this guest blog post by Annelise Doll, Digital Initiatives Librarian at the Van Pelt & Opie Library at Michigan Technological University.

In the fall of 2015, I began training to become a Lean facilitator here on campus and am always excited to apply the many tools and tips I learn in these sessions to my work in the library. This not only improves my work, but also is great practice for when I become a facilitator. Sometimes it takes a new perspective from our discussions to see how I could use a particular tool, but Lean philosophy can be adapted to so many environments that it never takes long to understand how it can be useful. Standardized work, however, escaped me. When I was introduced to the concept, I could see the value right away: improvements in the quality of products, ease of training new people, and the creation of a safer work environment, to name a few. Even so, I struggled with where I could use this concept in my own work. I didn’t have to wait long for an opportunity though, and it came in the form of a coffee maker!

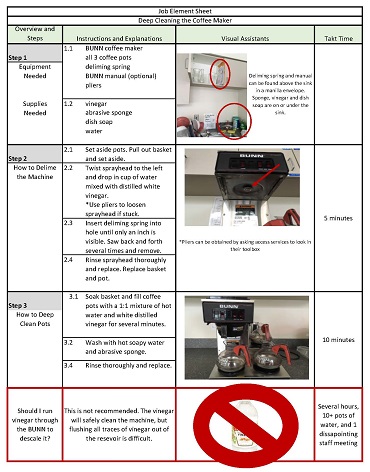
In an effort to increase cleanliness, the library recently implemented a system that recognizes individuals for cleaning the staff lounge. I’m known for regularly deep-cleaning our large bunn coffee maker, and now there are a few more people who’d like to help. Unfortunately, the task requires a few techniques and special pieces of equipment, so when I’m not in the office to assist it can be a difficult task to complete. Standardizing this work by creating a job element sheet certainly seems like the perfect solution to this issue!

Job Element SheetI formatted the job element sheet based on the one used by Catering Services for, coincidentally, making coffee. After picking out the steps involved and taking photos, I realized it would be easy enough to also create a sheet for how to brew a pot of coffee. Maybe it’s my love of the perfect cup of joe, the intimidating nature of a commercial coffee maker, or the fact that it can be difficult for many people to remember how much coffee to use, but for whatever reason I’m also the one who usually makes coffee for staff events. For being such a simple process, I know from experience that there are an outstanding number of ways it can go wrong! I tried my best to draw on this knowledge to help others avoid mistakes like pouring water into the machine without a pot underneath or forgetting to turn the burner off.
I’ve placed the sheets next to the coffee maker in the lounge and will ask for feedback from others in the library who are willing to test them out. I hope that the clarity and sequence of the steps can be improved as time goes on, and maybe the experience will inspire others to use a tool like this in their work. In any event, I’m sure I’ll be enjoying some excellent coffee made by my colleagues in the future!

If you think standardizing your work by creating a similar tool would be useful for you, please share your idea in the comments!


Instant Application for Workshop-Related Tool

We are pleased to present this guest blog post by Kathy Wardynski, Manager of Purchasing and Process Improvement for Dining Services at Michigan Technological University.

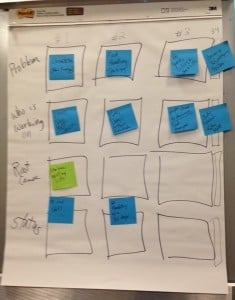
Last week I had the opportunity to attend a Lean concepts workshop  presented by Jean Cunningham. Following the workshop was an opportunity to ask Jean questions. Someone asked her how to approach the improvement process when there are many, many problems to solve. She showed us a tool to use at a weekly team meeting that manages the team’s capacity to problem solve. The tool, essentially a work project kanban, makes the problem-solving process visible, but also restricts the number of problems the team works on at once. It’s a simple chart (see picture) that provides space to track the status of three to four problems or tasks.

Work Project Kanban

When a problem gets solved, it’s removed from the chart and a new task is added. If the problem isn’t solved in a couple of weeks, it isn’t a simple problem and should be removed from this list and considered as a larger project. Using this process will enable a team to focus on quickly solving a few issues at a time, rather than making slow or no progress on many issues.

One of the improvement projects that Dining Services is working on this summer is developing a comprehensive employee training program. This is a very large project that will take several years to fully implement. It’s also something that has to be done in addition to our regular work. Every large project is a series of small tasks put together, so we’re using Jean’s tool to manage our volume of work. A weekly discussion of project status and identifying the next steps to take will keep us on track to accomplish our long-term project.

Confirm Your Scope with SIPOC Diagrams

One of my favorite continuous improvement tools is called a SIPOC diagram. A SIPOC diagram is used by a team to identify all relevant elements of a process improvement project before work begins. Using this tool helps define a complex project and refine a project profile. SIPOC diagrams also help to confirm the scope of the improvement project.

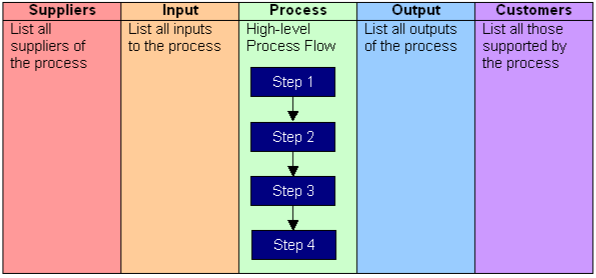
Its name prompts the team to consider the suppliers of your process, the inputs to the process, the process your team is improving, the outputs of the process, and the customers that receive the process outputs. The SIPOC is a valuable tool that will:

  • Identify suppliers and customers
  • Establish the scope of the project, and satisfy stakeholders that the problem area is captured in the process
  • Target the right metrics for verifying customer requirements
  • Establish who should participate on the project team

SIPOC stands for:

  • Suppliers- supply the inputs for the process
  • Inputs- materials, equipment, information, forms, staff, etc.
  • Process- the steps of the process from initial step to finishing product step
  • Outputs- outputs to internal or external customers, i.e. reports, products, services, etc.
  • Customers- anyone who receives the outputs

SIPOC Diagram Template

How to Complete a SIPOC Diagram

  1. Process— The first step to completing the SIPOC is to list the process steps, keeping detail to a minimum by only outlining five to eight steps.  When describing the process steps, try to limit the description to two words. Have each description start with a verb (action) and end with a noun (subject).
  2. Output—What information, data, reports, materials, etc. come out of this process or are produced as a result of the process?
  3. Customers—Who or what receives the outputs of the process?
  4. Inputs—What data, supplies, systems, tools, etc. are required for the process, or who is needed to perform the action?
  5. Suppliers—Who or what functional organization, system, report, database, etc. supplies or provides whatever it is that is needed as an input for the process?  Who supplies what’s needed to do the process?

To learn more about SIPOC diagrams email us at improvement-l@mtu.edu or call 906-487-3180.