Navigation on CMS websites is located at the top of every page as tabs with dropdown lists for subnavigation links. Left navigation is included on internal pages (unless left navigation is manually turned off)—displayed to the left of the content area on desktop or under an “Also in this section” accordion on mobile. The top and left navigation will always match.

Navigation is controlled through the _nav.shtml files automatically created with a new section or additional _nav.shtml files that are created manually. New pages are automatically added to the bottom of the parent navigation file if you select Yes for “Add Navigation Item” when creating them. These files must be published in order for changes to appear on the live site.
Each nav file controls the navigation for the section below it. If you are in the main root folder for a site, the _nav.shtml file will include the tab navigation links only. If you are in the first folder beneath the root folder the _nav.shtml file will have the subnavigation for the tab represented by that folder.
Navigation on the live site can include one additional level beneath this subnavigation, however these links will not appear until the user goes to the parent subnavigation page. Any nav files below that level would not be used on the site. If you are in the most interior page’s folder the _nav.shtml file will only contain the page you are on.
Editing Navigation
A nav file is made up of a bulleted list of links. On the code side, it is just the <li> items without the <ul> tag.
Rearranging the Order
- Select the text for the link you want to move.
- Cut the content using Ctrl/command + x.
- Delete the stray bullet that is left behind.
- Put your cursor at the end of the text above or at the beginning of the text below where you want the cut link to be moved to.
- Press Enter/return.
- Next to the new bullet that you created, paste the cut linked text using Ctrl/command + v.
- Save and publish.
Add a Link Manually
You can manually add links to your pages or other webpages outside your site within the navigation.
- Put your cursor at the end of the text above or at the beginning of the text below where you want the new link to be.
- Press Enter/return.
- Next to the new bullet that you created, type the text that you want to appear.
- Select the text.
- Click the Insert/Edit Link icon in the toolbar.

- Use the file chooser to select the page from your website that you want to link to or paste the URL of a page outside your website.
- Click the OK button.
- Save and publish.
Remove Existing
When a live webpage that was linked in the navigation is recycled, that link is not automatically removed from the navigation. It would become a broken link on the website.
- Select the text of the link to the page that has been recycled.
- Delete the content and bullet.
- Save and publish.
Classes
There are a few options available in the Class dropdown of the Insert/Edit Link window.
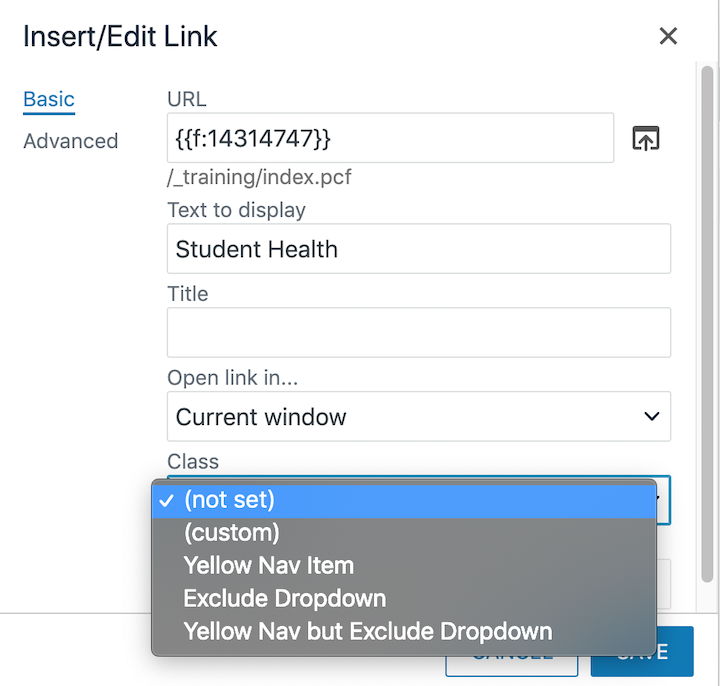
Yellow Nav Item
This option only applies to the tab-level navigation that is on the far right (the last bullet in the root nav file). Selecting this class will add a yellow box around the tab to highlight it.

Exclude Dropdown
This option applies to any nav file. Selecting this class will remove any subnavigation below that link.
- This can be used to fix a duplicated navigation item.
- It can also be used when linking to another section and that section’s subnavigation should not be displayed.
Yellow Nav but Exclude Dropdown
This option combines the previous two. Using it on the last bullet in the root nav file will make that tab yellow and not display any navigation below it. Using it in any other nav file would only remove subnavigation, it would not affect the color.
Advanced Functionality
There are many advanced options that can be done with navigation. If something you want to do is not listed here or you are unsure, please email webmaster@mtu.edu for additional help.
Subnav From a Different File
The scenario is that the tab links to a certain page, but the subnavigation is not from that page’s section.
When a navigation link is set up in the nav file it can have two links on different text in one bullet. The first link will determine the text that is displayed and where that text links and the second link determines the subnavigation. Here are the steps:
- Insert the regular link as desired if it is not already there.
- Insert a space after the linked text.
- Make sure the space is not linked.
- Type in any text, “subnav” is a great option.
- Link that second text to the navigation file that you want to use for the subnavigation.
- Save and Publish.
Creating the Nav File
The navigation file that is used in the previous process is most likely a custom set of links that isn’t used elsewhere. This is how to create that nav file.
- From the Pages List View, navigate to the folder that holds the nav file that will have the alternate subnav.
- Click the More Actions (…) menu for the existing _nav.shtml file, go to File, and select Copy.
- Click the blue Copy button.
- Look for the new nav file, probably named _nav-1.shtml, click the More Actions (…) menu, go to File, and select Rename.
- Change the “1” in the filename to something more descriptive and press Enter/return. In the Pavlis Honors College example we could use “enterprise” so our final filename would be _nav-enterprise.shtml.
- Edit the nav file to manually create your navigation.
- Save and Publish.
Troubleshooting
Duplicated Left Nav Item
The system evaluates the navigation link of the first page compared to the link for the navigation below it. If those links are identical, it will not display the subnav. Keep in mind the link “/ou-training/navigation/troubleshooting/” is not the same as “/ou-training/navigation/troubleshooting/index.pcf”, even though the page that is displayed on the live site is the same!
- In the parent nav file select the Exclude Dropdown class.
- In the page’s nav file delete the item for itself.
Duplicated Top Nav Item
The top navigation works a little differently. There are times when we have a tab that is linked and that same page is also linked in the navigation below it. If the system ignored identical links at this level, that setup would not be possible.
- In the root nav file select the Exclude Dropdown class. This would remove ALL subnavgation!
- In the page’s nav file delete the link for itself.