The University Events Calendar is for attendable events—not deadlines, dates to remember, private departmental retreats, etc. There are two ways to post events to our Events Calendar:
General Campus Community
- Use the gold “Submit an Event” button at the bottom of the calendar homepage.
Calendar Admins
- Login to the calendar using the link in the header.
- Once logged in, click the “Calendar Admin” shortcut in the header.
- Click the “Add an Event” button in the Events menu.
- Follow the steps below to fill out all of the event information.
Please note that calendar admins have access to additional fields that do not exist on the public event submission webpage and skip the approval queue.
If you are a calendar admin, please use the event submission form available through your Admin login, as specified above. If you do not have admin access, but often add events for your department, please request access by sending your name, user ID, and department(s) to webmaster@mtu.edu.
Instructions for Event Information for Admins
The following is a step-by-step guide for event admins filling out event information through the admin dashboard. It is important to use the fields correctly as there is additional code set up to provide specific information to Google in order to display events in search results.
Step 1. Basic Information
- *Name/Event Name (Required): This is the title of your event. It should be descriptive, but not more than 7 words, if possible.
- Description (Strongly Recommended): Describe what your event is about. Include information about who the event is for, where your event is located, and who is hosting the event in case someone copies your event information. Calendar Admins posting via their Admin login have access to add links and media sources. When adding a YouTube video embed you must change the URL from www.youtube.com/watch?v=<idcode> to www.youtube-nocookie.com/embed/<idcode> to prevent the YouTube tracking cookie from being generated in order to be in compliance with the European Union’s GDPR law. Include information about accessibility. Refer to the Guidelines for Planning Accessible Events from Equal Opportunity Compliance and include accessibility information in the event description.
- Schedule
- *Start Date (Required): On which day does your event start? There are several ways you can enter a date: Oct 3, October 3, 10/3, “Next Friday,” “Tomorrow,” 10/4/19, etc. As you type, the date below the field will update accordingly.
- Start Time (Strongly Recommended): At what time does your event start? You can type as little as 6p or 10a. Enter the time for the event based on its location. For example, if the event is at 11 a.m. central time in Chicago, you would put 11 a.m. Times are assumed to be specific to the location of the event.
- End Time: At what time does your event end? You can type as little as 6p or 10a.
- Repeating: Use if your event is recurring (ie: daily for a week, monthly for the semester, etc).
- Click the “Add Above to Schedule” button to add the date/time to the event. You can add multiple dates by repeating from the Start Date.
- Location
- *Experience (Required): Choose In-Person, Virtual, or Hybrid to designate how your event is attended. This selection affects what icons and other information appear on your event.
- In-Person Events
- Event Place: Enter the venue where your event will take place. As you type your venue, you’ll see campus location options pre-populate. Select your venue from the list, so that you are linked to it unless the event takes place off campus. Selecting the location from the list will include a map view of the building on your event to help users find the venue.
- Room: Enter the room number for your event, if applicable.
- Address: This field will appear if you do not link to an Event Place. Adding an address will include a link to Google Maps for directions.
- Virtual Events
- Zoom Integration: Use the link to set up your Zoom meeting right from the calendar.
- On the Zoom Sign In screen, choose the Sign in with SSO option on the right.
- Enter michigantech for the domain.
- Sign in if needed.
- You may need to authorize Zoom information to be shared with the calendar the first time you use this function.
- The meeting will be set up in Zoom, based on your Zoom settings, and the Dial-In and Stream URL fields will be automatically populated with the information from Zoom.
- You can use the Delete Zoom Meeting to delete it once it has been created.
- Dial-In Instructions: Provide any additional information about how to access the virtual event. This text can be formatted. The URL for watching or joining the event should not be entered in this field.
- Stream URL: Paste in the URL for watching or joining the event. This could be a Zoom URL, Google Meet, etc. Adding the URL here will display a View Stream icon on your event. If the user must register for the event first, see the “Tickets & Registration Tab” step in these instructions. The registration link should not be entered in this field.
- Stream Embed Code: If the virtual event platform you are using provides code for embedding the live stream, paste in the code. This will embed the stream into the event.
- Zoom Integration: Use the link to set up your Zoom meeting right from the calendar.
- Hybrid Events allow for all field options from both In-Person and Virtual events.
- In-Person Events
- *Experience (Required): Choose In-Person, Virtual, or Hybrid to designate how your event is attended. This selection affects what icons and other information appear on your event.
- Classifications: At least one selection for each field is required.
- *Event Type (Required): You can select one or more event types from the dropdown menu. To select multiple types, simply select one, return to the menu and continue selecting others in any order. It is important to select relevant event types to make it easier for users to find your events.
- *Target Audience (Required): Select one or more Audiences from the list in any order. Selecting relevant audiences is important to make it easier for users to find your events.
- Tags: Calendar Admins only. Enter 3-7 keywords related to your event, to make it easier for users to find your event when they search and to group events together.
- Groups: UMC only. Please leave this blank. Student Organizations must submit their events through Involvement Link and they will be automatically imported to the Events Calendar nightly.
- *Departments (Required): Selecting a Department will automatically add your event to that Department’s calendar. You can select one or more Departments from the list of those you have access to. All events on the University Events Calendar must be sponsored or hosted by a University department.
- Keywords: These are hidden from users and can be used for common misspellings or custom widget selections. The keywords are searchable by users.
- Save and Continue.
Step 2. Details
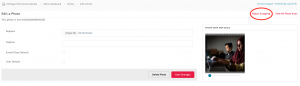
- Photo (Strongly Recommended): You have the option to upload a photo of your choice. You could also “Choose from Photos” to select a generic campus image. Different image sizes are used in different places on the calendar. Additional information about photo sizes is available.
- After saving your event, click on the pencil icon next to the image to edit it.
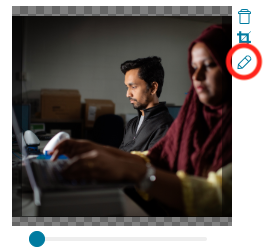
- Click the Adjust Cropping link in the upper right corner of the screen.
- Use the slider under each photo to change the zoom of the image and move the photo to the desired look. The “Featured” image size will be the image at the top of your event page and the “Rectangle” is the image that shows up on the listing pages.
- Photo Description: Enter the alternative text for the photo to comply with accessibility requirements.
- After saving your event, click on the pencil icon next to the image to edit it.
- Speakers: Speakers are not currently available.
- Hashtag: If a hashtag is associated with your event, such as #mtuwc for Winter Carnival, please enter your hashtag without the “#” symbol.
- Event Website: If you have a webpage or website that explains more about this specific event, enter the URL here. This field should not be used for a registration link—see the “Tickets & Registration Tab” step in these instructions.
- Custom Fields
- Host: Indicate who the host of the event is, using free-form text. It could be a department, a group, or a person. We recommend the name of the department, when possible.
- Contact Name: Include the name of a specific contact person, if desired.
- Contact Email: Include the email for the contact person/department, if desired.
- Contact Phone: Include the phone number for the contact person/department, if desired.
- Facebook Event URL: If you have created a Facebook Event for this event, paste in the Facebook URL.
- Vanity URL: Calendar Admins only. If you would like to advertise your event in print media, you can customize the URL by entering a keyword here.
- Save and Continue.

Step 3. Tickets & Registration
- Use Localist Register: Calendar Admins only. We have not purchased this module. Leave it unchecked.
- Ticket Cost: If your event requires tickets, please enter the cost. It can be a single dollar amount, a range, or a description such as “Youth: $5, Adults: $20”. Entering a cost here and a Registration URL will display a “Tickets” button on the event. Leaving this field blank and including the Registration URL will display a “Register” button on the event. If you enter “0,” “0.00,” or “Free” in the cost the system will mark it as a free event. If only certain admission is free, for example, “$5 Youth/$10 Adult, Free with Experience Tech” you should use “No Cost” instead. “$5 Youth/$10 Adult, No Cost for students with Experience Tech”
- Registration URL/Ticket Link: If users can order tickets online or need to otherwise register for the event, please enter the URL to your ticketing/registration website here.
- Eventbrite ID: Calendar Admins only. If you have created an event in Eventbrite, you can enter the ID here.
- Save and Continue.
Step 4. Attendee Engagement
- User Engagement Calendar Admins only.
- Allow users to post comments and photos: If you would like to allow comments, reviews, and feedback, leave this checked.
- Allow users to mark themselves as “interested” in attending the event: Unchecking this disables the “Add to My Calendar” and “Invite Friends” functionalities.
- Allow users to see who is attending this event: Unchecking this removes the “People Interested” box.
- Event Insights: Calendar Admins only. When these options are checked, users who chose “Add to My Calendar” for the event are sent an email afterward with a link to a survey. You will have access to these survey results through the admin dashboard.
- Save and Continue.
Step 5. Publish
- Visibility: UMC only. Leave this set to “Public”.
- *Status (Required): The status should initially be set to “Live” but can later be changed to Canceled, Postponed, or Sold Out, which appends the event name to reflect this new status.
- Featured: UMC only. Do not change this.
- Boos this event: UMC only. Do not check.
- Exclude from Trending Events: UMC only. Do not check.
- Save & Publish.