The editor is an authoring tool that makes it easy for you to format your text. When you click an Editable Region to make changes to it, the editor opens. The region you are editing is highlighted and a toolbar appears at the top. Many of the tools in the editor are familiar if you have used other programs such as Microsoft Word or Google Docs. Others are specific to this CMS and are explained in this post and in other instructions.

Toolbar Functions
 Save and Exit: Saves the changes you have made to the content and closes edit mode, returning you to the edit screen where you can select another region to edit.
 Exit without Saving: Closes edit mode for the region you are on without saving any changes you have made. This requires you to click OK to confirm this selection and then returns you to the edit screen where you can select another region to edit.
 Restore Last Draft: Auto Draft will automatically save your changes approximately every minute while you are editing. The last save stored by Auto Draft can be recovered up to 20 minutes later in the event that your browser window is closed or lost. This icon is only shown in browsers that support this feature.
 Cut: Removes the selected content to the clipboard that will allow you to paste it in another location.
 Copy: Copies the selected content to the clipboard allowing you to paste it as a duplicate in another location.
 Paste: Pastes content that you have cut or copied into the selected location, maintaining any links or formatting that were in the original content.
 Paste as Text: When toggled on, content that you paste into the selected location will have any links or formatting that were in the original content removed. This option should always be turned on when pasting content from a source outside the CMS.
 Find and Replace: Allows you to search for specific characters and replace each instance with a different set of characters.
 Undo: Reverses the last change you made.
 Redo: Reverses the last Undo.
 Spell Check: Clicking the icon checks the content for misspelled words, underlining them in red. It will not continue to check additional content you type, so you should check after you have entered all content. Clicking on a misspelled word will give you correctly spelled alternatives to choose from. Clicking on the arrow next to the icon will allow you to choose a different language to check spelling in.
 Clear Formatting: Removes formatting applied to the selected content, such as bold or italics.
 Bold: Applies bold formatting to the selected text.
 Italics: Applies italics formatting to the selected text.
 Strikethrough: Applies strikethrough formatting to the selected text.
 Bulleted List: Formats the subsequent text or selected text into a bulleted list. Clicking on the arrow next to the icon allows you to choose an alternate bullet style.
 Numbered List: Formats the subsequent text or selected text into a numbered list. Clicking on the arrow next to the icon allows you to choose an alternate number style.
 Decrease Indent: Reduces the indentation of the selection.
 Increase Indent: Increases the indentation of the selection.
 Superscript: Changes the selected text to superscript.
 Subscript: Changes the selected text to subscript.
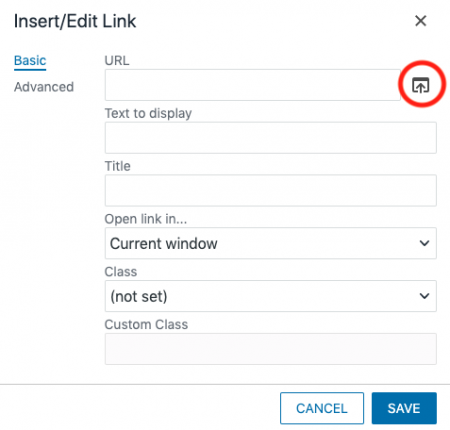
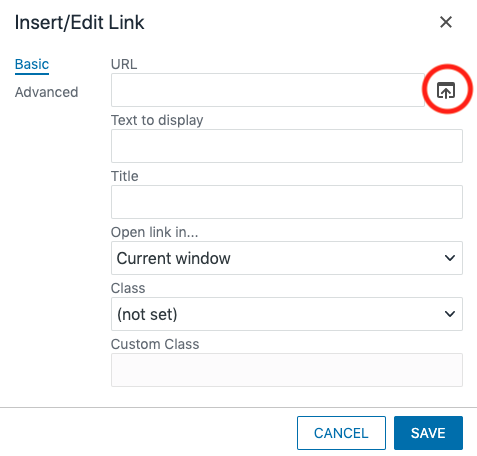
 Insert/Edit Link: Links the selected content to another page in the CMS or an external website.
- If linking to another page in the CMS that you have access to edit, use the folder icon at the end of the URL field to select the page.
- Text to display is what the page text is, this should already be filled out.
- Title is what will show up if you hover over the link on the live page. This is normally left blank.
- Target will determine if the link will open in the current window (None) or a New Window. This selection will be overridden by the CSS for our websites. All Michigan Tech links will open in the same tab, external links will open in a new tab.
- By selecting a Class you can create a gold button, a black button, an outline button (blank), an arrow, a black underlined link, or a blue font-color link. View the link styles in the Style Guide.
 Remove Link: Removes the link from the selected content.
 Mailto Link: Allows you to set the email address and subject to create a mailto link.
 Help: Provides more information about the toolbar items in a pop-up window.
 Paragraph: Applies heading formats to text. Only Paragraph, Heading 2, Heading 3, Heading 4, Heading 5, or Heading 6 will be used.
 Styles: Applies custom coding to content including font size, link formatting, horizontal rules, and alignment. View the font styles in the Style Guide.
 Text Color: Changes the color of selected text. Please note that the default options provided may not meet accessibility requirements for color contrast, depending on your background color.
 Insert/Edit Image: Inserts an image. You should first create your images in the CMS using the Image Editor gadget.
 Insert/Edit Media: Allows you to insert a video using a URL or one that is in the CMS or to insert embed code such as an iframe. For all videos, use the Video Snippet instead.
 Horizontal Line: Inserts a horizontal line at the cursor. View the basic and styled horizontal rules in the Style Guide.
 Insert Line Break: Inserts a line break at the cursor. This would put the following content on the line below the previous text without a line space between (same as Shift+Enter).
 Special Character: Allows you to choose a special character to insert.
 Show Blocks: Toggles the view to show or hide block-level element labeling.
 Source Code: Allows you to view and edit the code view of the HTML source.
 Insert Snippet: Adds special formatting with entry areas for certain content so you can create various widgets. See the Snippets section for more details.
 Insert Asset: Adds shared content to the page. See the Assets section for more details.
 Table: Menu for table functions.
 Maximize Region: Expands the editable region to fill the width of the frame window.
Keyboard Shortcuts
Within the editor, you can also use most basic keyboard shortcuts. Some browsers do not allow the use of the cut, copy, and paste icons, but the shortcuts will still work.
- Ctrl (PC)/Cmd (Mac) + S: Save-in-place—saves changes to the staging server, but you will remain inside the editor to continue working.
- Ctrl/Cmd + X: Cut
- Ctrl/Cmd + C: Copy
- Ctrl/Cmd + V: Paste
- Ctrl/Cmd + Shift + V: Paste as plain text
- Ctrl/Cmd +Z: Undo
- Ctrl/Cmd +Y: Redo
- Ctrl/Cmd +B: Bold highlighted text
- Ctrl/Cmd +I: Italicize highlighted text
- Ctrl/Cmd +F: Opens the WYSIWYG Find and Replace tool
- Shift + Enter/Return: Creates a new line break in the current block (the cursor will move to the next line without an empty space between)