All images are created in the CMS using the Image Editor gadget. You can crop specific sizes using the gadget, insert the cropped images in pages, and replace existing images. The image editor will automatically optimize and publish the images. Make sure the image that you’re uploading is less than 25 MB so that it is able to be used in the editor—when downloading a file from the UMC photo database, select the 4800 px option. All images used in the Image Editor must be RGB format, not CMYK.
If you want the user to perform an action (apply, attend an event, etc) you should incorporate images onto your page to be more engaging. For pages that are purely informational, administrative, or internal, images are not necessary.
Tip: If you insert an image from the Image Editor onto a page, but the image is rotated or had a chunk of black covering it, this is because the Image Editor cannot read EXIF data (a special region where digital cameras record additional information about a photo such as the date and time it was taken, GPS coordinates, and the orientation of the device). Open the original image in a photo editing application, rotate the image 360 degrees, and save a copy. Use the copy in the Image Editor Gadget.
Create New: Uploading and Cropping
You will use the Image Editor gadget to upload and crop your images to the appropriate size(s). It’s located in the Gadget Sidebar. Open it by clicking the plug icon ![]() in the upper right corner of the screen.
in the upper right corner of the screen.
You must have a page open to see the Image Editor option in the Gadget Sidebar. Whatever page you have open will determine the folder location for the images folder that the Image Editor will create.

Image Editor Gadget Introduction
Scroll up or down in the Image Editor gadget to see all the field options.
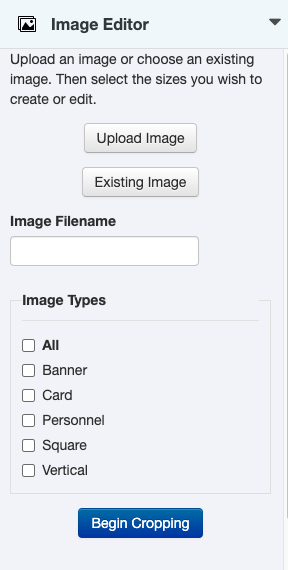
- Open the page where you intend to insert an image.
- Open the Image Editor gadget in the sidebar.
- Click the Upload Image button to select an image file from your computer. The file must be a .jpg or .png and under 25 MB.
- Once your image is selected, you can change the image filename by typing in the Image Filename field.
- The filename will default to the name of the file from your computer with any capital letters made lowercase and spaces or other characters changed to hyphens.
- Change your filename, if needed, to be descriptive of the image. For example, use campus-panorama instead of img-1234567.
- When the gadget saves your cropped images the image type and size will be added to the end of your filename.
- Check one or more boxes for the image type(s) you want to create. You can also select All to crop all image types. Note: instructions for specific snippets or functions in the CMS will typically tell you which type(s) to create. See more about the Image Options.
- Click the blue Begin Cropping button
- A new window will open to allow you to crop each image size you selected. Move and resize the crop box as needed. For all types except Vertical you will not be able to change the aspect ratio.
- The image size currently being cropped will be displayed at the top of the page.
- For the Vertical type click the Select Whole Image button to select the entire image.
- The Crop Status will let you know which of the sizes for that type will be cropped. The system will not crop an image size if that size is wider than the original image size.
- The Preview at the bottom of the window will show you what the final image will look like, to scale.
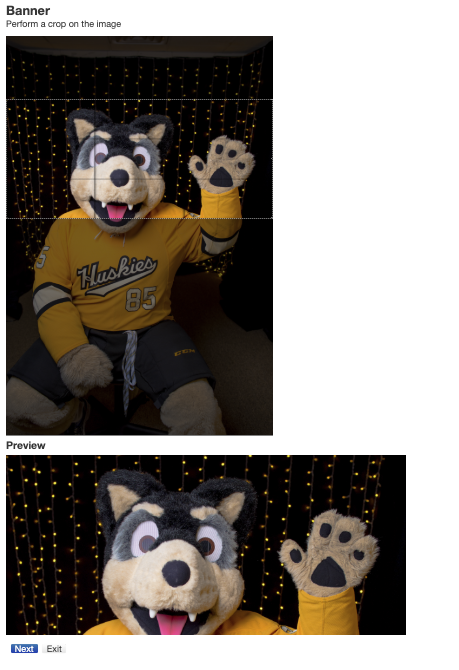
- Click the Previous button to go back one screen, click the Next button to go to the next screen, or click the Exit button to leave this window without saving.
- The final screen you will reach when clicking Next will be the confirmation screen. Preview all sizes of your images and review the Crop Status. Click Previous to go back and recrop images, Exit to leave the window without saving, or Confirm to save your changes and create the images.
- When creating the images, the files will be compressed and optimized for the web.

Image Editor Gadget Create New
Edit Existing Image
If you need to edit an existing image that was created using the Image Editor gadget, you can follow the same instructions, except choose the Existing Image button instead of Upload Image in step 2. This will let you choose an original image from within the CMS. You will be able to change the crop of an existing image type or add a new image type. Once selected, you will be able to continue with cropping.
If you receive an error in the window that opens, close the window, save any changes you were making in the CMS, and reload the browser window. Then click the Existing Image button again.

Image Editor Gadget Existing Image
Insert Image
Once your images have been created you can use the Insert/Edit Image icon from the toolbar to place the picture.
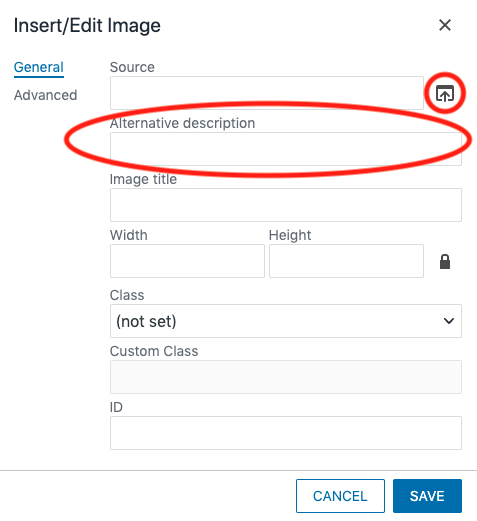
- Click the Insert/Edit Image icon in the toolbar.

- Click the file chooser icon.
- Navigate to and choose the correct-sized photo that you cropped. Do not select the -orig option.
- Enter a description for the image. This is the alt text used by screen readers and other assistive technology.
- Click the blue OK button.

Insert Image
Replace Existing Image
You can change an existing image and its crops to a new image and have it automatically update across all pages where it is used.
- Open the page in the folder that has the images folder where the image you want to replace is stored.
- Follow the instructions for creating a new image, making sure that the file on your computer is named the same as the original image that you are replacing (without the -orig part).
- If the filename is different, change the filename in the Image Editor to match after you select it.
- Make sure you select at least the same crop sizes that already existed.
- Publish the page(s) that the images are on.
Image Size Options
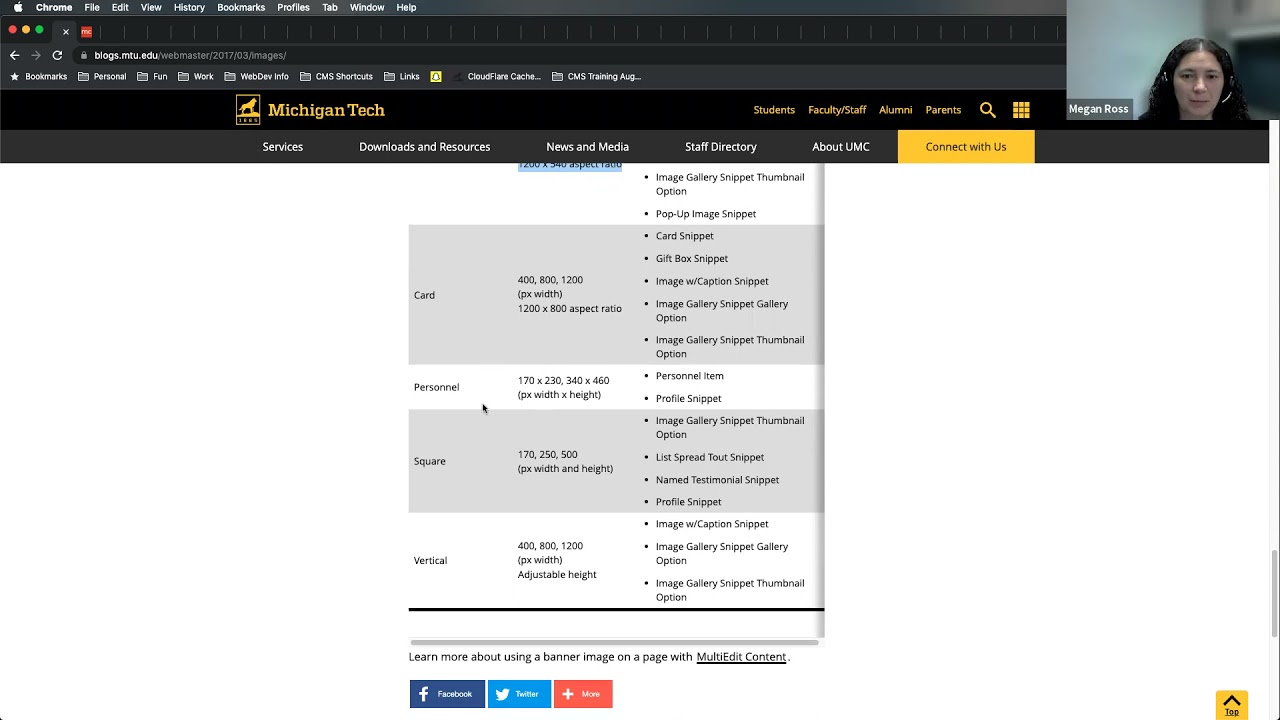
Image Options
| Image Type Name | Output Dimensions | Suggested Use |
|---|---|---|
| Banner |
450, 800, 1024, 1200, 1600, 2400 (px width)1200 x 540 aspect ratio |
|
| Card |
400, 800, 1200 (px width)1200 x 800 aspect ratio |
|
| Personnel |
170 x 230, 340 x 460 (px width x height) |
|
| Square |
170, 250, 500 (px width and height) |
|
| Vertical |
400, 800, 1200 (px width)Adjustable height |
|
Learn more about using a banner image on a page with MultiEdit Content.