Content managers may occasionally want to search for specific phrases within the content of their CMS website. To search your site for a specific phrase, follow these steps.
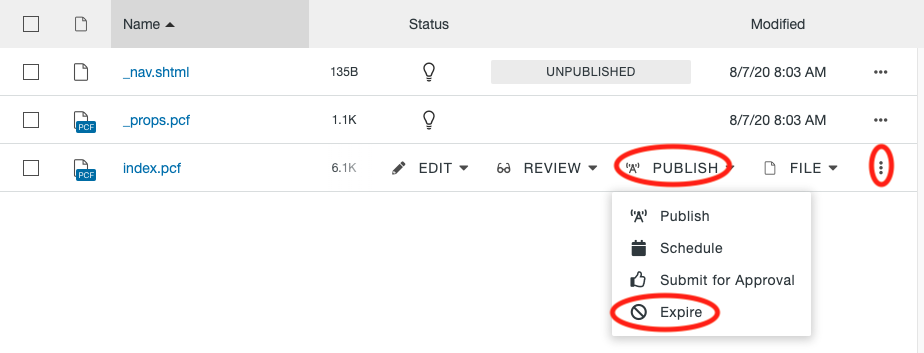
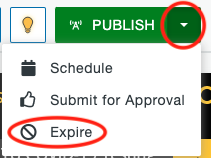
You can schedule a page to expire at a specific date and time. The available options depend on the file type and your access permissions. Expire options can be reached from the Pages List View by opening the More Actions menu and selecting Expire under the Publish dropdown or from the dropdown arrow next to the green Publish button when you have the page open.
There are different options for expiring content, Replace or Recycle. For each option you have the ability to send a notification to yourself or a group of users. It will be sent with the CMS and you can select the Send Copy to Email checkbox to also send a notification to the user’s Michigan Tech email. You will select the To from the dropdown, enter a Subject, and enter a Message.
Before removing any page you should first check its dependencies.
You can upload files to the CMS that can be linked to on a webpage. Types of files you can upload include audio, video, PDFs, Microsoft Office files, and more. These files have a size limit of 20MB each. After uploading, you must publish the file.
This process should not be used for images. Instead, use the Image Editor sidebar gadget.
All images are created in the CMS using the Image Editor gadget. You can crop specific sizes using the gadget, insert the cropped images in pages, and replace existing images. The image editor will automatically optimize and publish the images. Make sure the image that you’re uploading is less than 25 MB so that it is able to be used in the editor—when downloading a file from the UMC photo database, select the 4800 px option. All images used in the Image Editor must be RGB format, not CMYK.

