Respondus Live Proctoring; Is this the right tool for your class?

Lockdown Browser +Instructor Live Proctoring

Pandemic-induced remote instruction practices have brought new challenges for protecting the integrity of student assessments. If you can’t administer your exam in the classroom and can’t use the services of the Michigan Tech Testing Center (students not campus-based) there are other options.

Michigan Tech instructors have had access to Respondus LockDown Browser and Respondus Monitor to support online assessments for some time. Now a third option called Respondus Live Proctoring is available. To review, LockDown Browser is a dedicated browser designed to confine the testing environment to Canvas. A companion tool called Respondus Monitor builds on this by leveraging student webcams and video analytics to help deter cheating in non-proctored environments. Instructor Live Proctoring adds to the Respondus toolbox by working in conjunction with LockDown Browser and Zoom to allow instructors to proctor exams live (via a Zoom meeting) for small classes (Respondus recommends up to 25). Let’s take a closer look at this new option.

To use Respondus Live Proctoring instructors create a Canvas assessment using the Quiz tool and then enable Respondus LockDown Browser and Live Proctoring from the LockDown Browser dashboard available in the Canvas course navigation.

Respondus Lockdown Browser dashboard in Canvas
Respondus LockDown Browser Dashboard
Live Proctoring Settings
Respondus Live Proctoring Setting

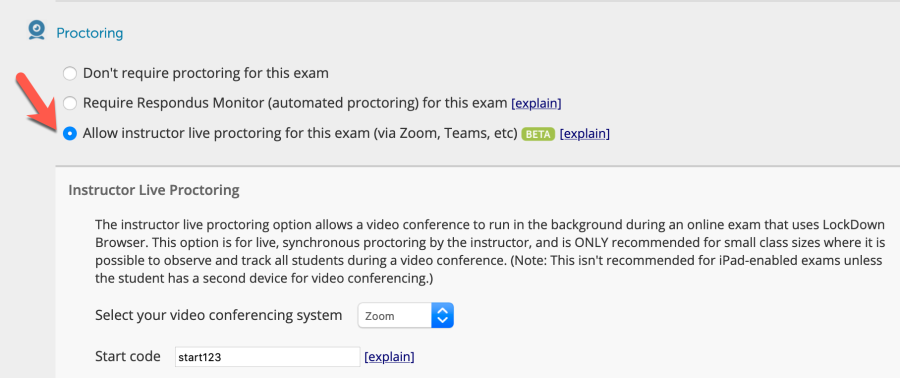
To avoid test day complications make sure students have previously installed LockDown Browser on the computer they will be taking the exam on. At test time students join the Zoom meeting for last minute instructions, attendance, and a start code that will allow them to open the exam from LockDown Browser. Canvas Classic Quizzes (used by most MTU instructors currently) require students to first open LockDown Browser, log in to the Canvas course, and then open the quiz. Once the quiz is opened in LockDown Browser, students are confined to the quiz environment, but the Zoom meeting is still active in the background. This allows the instructor to proctor students via their webcams in the Zoom meeting.

Important Considerations

The CTL recently tested the Live Proctoring feature and offers the following observations and guidance.

Test, test, test

It’s important to test this workflow before an actual exam. Creating a simple Canvas test quiz with the Live Proctoring feature enabled will allow for this. Students will have an opportunity to install LockDown Browser and open the test quiz to confirm that their system is working properly. This also gives you a chance to experience what Live Proctoring “looks like” from a Zoom meeting. As noted earlier, Respondus recommends this feature for small class sizes (no more than 25).

Limited communication during quiz

Once the Canvas quiz is underway the instructor maintains full access to the Zoom meeting while students have NO ACCESS to the Zoom meeting. As long as students leave their webcam and microphone on before starting the quiz the instructor will still be able to see and hear them. This also means that other students can hear them as well. As the instructor, you get to decide how to manage any potential distraction that may arise. You could ask students to mute their microphone before they open the quiz in LockDown Browser. Or you could ask students to leave their microphone on, but complete the exam in a quiet space to avoid distractions. You could also mute individual student microphones from your Zoom controls if distractions arise during the quiz.

It is technically possible for instructors to make an announcement in the Zoom meeting during the quiz, but students would not see the instructor. One option might be to inform students in advance that you will ask for questions at a predetermined time so students know there will be an opportunity to ask a question at some point. All students would hear any discussion between any one student and the instructor.

Live Proctoring is different that Monitor

The Live Proctoring feature does not record students during the test and does not provide instructors with any alerts of suspicious activity during exam time. That’s the job of the instructor. Automated recording and alerts is only available in the automated Respondus Monitor proctoring solution.

Resources


Assignment Feature in iClicker Cloud

Do you currently use iClicker Cloud to poll students during class?…do you wish you could poll students outside of class….say after a chapter reading to gauge their level of understanding of the content?

With iClicker Cloud’s new asynchronous Assignment feature you can create low-stakes assessments that can be completed outside of class and at a student’s own pace.

Examples of when to use iClicker Cloud Assignment

  • Before class – gauge students’ understanding or preparedness for upcoming lectures, chapter readings or homework understanding.
  • During class – for small group activities.
  • After class – to support homework activities.

Setting up iClicker Cloud Assignments

Within the iClicker Cloud Instructor Website, you can create questions for the iClicker Cloud Assignment.

  1. Create your lecture slides as you normally do. Include a slide for each iClicker question. iClicker Cloud Assignment supports Multiple Choice, Short Answer and Target question types.
  2. Extract your iClicker question slides from the main presentation. A separate file that contains only question slides can be used in an iClicker Cloud Assignment.
  3. Export the question slides file as a PDF.
  4. Go to the iClicker Cloud Instructor Website and create the assignment.
  5. Add the assignment details and upload the PDF that contains the question slides.
  6. Format the Assignment. The assignment has now been added to your “Assignments” page where you are able to manage, edit, view grades and export grades to your LMS.
  7. Based on the release date that you set for the assignment, students will now be able to see the assignment(s).
  8. Scores from completed assignments can be manually uploaded into Canvas.

Student access to Assignments

Be sure to let your students know that you are now using Assignments in iClicker. A student can complete the assignment by finding the instructor’s course in their list of courses and selecting Assignments from the menu. Here is a helpful guide to provide your students on Accessing an Assignment in iClicker Reef.

If you have questions about using iClicker Cloud Assignments, Canvas, Zoom or Huskycast, feel free to contact us at elearning@mtu.edu

Three Huskycast features you should know about

Huskycast

Huskycast is Michigan Tech’s branded Panopto video platform. In the years leading up to the pandemic we saw a steady increase in video usage, both in lecture capture recordings and in content uploaded to the system. With the dramatic shift to remote instruction over the last year video usage has exploded (not surprisingly). With more users than ever creating and/or viewing content in Huskycast let’s review three great features that you may not know about.

Panopto-Zoom Integration

Many instructors are using Zoom to provide a synchronous remote environment for their course meetings. The ability to record Zoom sessions is a great way to allow students to review the class sessions again, or to catch up on sessions they may have missed. With the use of a recurring Zoom cloud meeting instructors can automatically have their recordings transferred to a designated Huskycast course folder in Canvas. This can save you lots of time managing content between Zoom and Huskycast and all students enrolled in the associated Canvas course automatically have access to view the recordings. You don’t need to manually share links to the recordings either, since students can just click on the Huskycast course link and select the recording they wish to view. You can learn more about this integration and contact elearning with any questions. Don’t forget to enable the audio-transcript option in your Zoom recording so that a transcript file will transfer to Huskycast along with the Zoom recording.

Video Assignments

Looking to provide your students with an alternative mode for demonstrating competency of your course objectives (multiple means of action and expression)? Why not consider using video? Huskycast allows instructors to create video-based assignments that students can submit directly in Canvas. Students can use the available recording tools in Huskycast to create their video, use other video software, or just record on their phone. When they’re ready they can upload the video either directly in the Canvas video assignment, or into the Huskycast assignment folder in the course. By default student-submitted videos are viewable by only the instructor (and the submitting student), but you have the option to allow other students to view and comment on videos if desired. Some examples of effective video assignments:

  • Student introductions
  • Video-based discussion post
  • Multimedia-based final project presentation
  • Student teach-back session (students explain new concepts they recently learned)

Embedded Quizzes

A low-stakes knowledge check can be a good pedagogical tool for measuring student comprehension during instruction. In Huskycast you can add a quiz and ask one or more questions within your videos. This quiz allows learners to verify comprehension and can give them confidence to learn deeper. When building the quiz you can require correct answers before moving on, or just provide correct answers. You can even create Canvas assignments tied to a Huskycast quiz and have the points earner for correct responses be recorded in the Canvas grade book. Multiple choice, multiple answer, true/false, and fill in the blank questions types are available in Panopto-Huskycast quizzes.

Resources

Uploading a file in Canvas for an Assessment

Throughout the semester, the elearning team addresses lots of great questions on various ways that one can leverage Canvas for student assessment. One question we often address is, “What is the best way to have students upload a pdf of their handwritten work they did for a quiz?

Courtesy of Pexels

Great Question!…in order to answer this, we need to first consider the following:

  • Do you want to be able to annotate the pdfs within Canvas? Do you prefer to download the pdfs, annotate w/ an external tool and re-upload into Canvas?
  • Do you use Respondus Lockdown Browser for your quiz?
  • Is it a timed quiz?

If you answered yes to any or all of these questions, we recommend that you…

Offer an Assignment directly after the Quiz for file submission

Why?….

Due to some limitations with Canvas Quizzes a preview of the pdf in Speedgrader is not available nor does Canvas Quizzes offer the ability to re-upload submissions! Using Respondus LockDown Browser may limit students ability to create a pdf and a timed quiz may not allow sufficient time for a student to scan and upload the file. Frustrating…I know… but the workaround of offering an assignment directly after students complete the quiz will resolve these frustrations! To do this….

Adding a ‘File Upload’ question type to the end of a Canvas Quiz

If you happened to answer No to any or all of the questions stated above, you can simply define the last question on your quiz as a ‘file upload‘ question type. This will allow students to upload their pdf as the final step in completing the exam. As a word of caution though…you will still need to download each submission from Speedgrader in order to review and grade the file.

Remember, in either case, students will need some time to scan their handwritten document, convert it into a pdf and upload it.

If you have an idea for a future blog topic that you would like us to address or just need additional support with Canvas, Zoom or Huskycast, please email elearning@mtu.edu

Canvas content pages or PDF’s: Is there a better approach?

You probably have lots of instructional materials loaded into your Canvas courses. You can present information from custom web pages, called content pages. You can also upload files into Canvas (documents, presentations, etc.). Is one approach better than another? While there is no single correct answer for all situations, considering your students needs when determining how to provide course materials can be a good approach.

Content Pages

A content page in Canvas is actually an HTML web page created with the tools available in the Rich Content Editor (RCE). Although you can enter HTML code to create this page, most folks use the visual RCE tools for this process. Providing instruction from a content page has some advantages for your students:

  • Can be accessed from a desktop/laptop computer, or mobile device (via Canvas student app) without the need to download or open other software.
  • Page content is responsive (adapts to reader preferences and display/device limitations).
  • Well-designed content pages work seamlessly with assistive technology

The Canvas RCE has tools for inserting and styling text, adding images and videos, and linking to other course resources or external sites. You can insert tables and math expressions (manually created or via LaTeX). You can also build math expressions using a variety of input methods from the powerful EquatIO tool available from the Apps tool (plug icon) in the RCE. A built in accessibility checker is also available to check for some common errors, such as missing alternative text descriptions for images, missing table headers, and proper heading and list structure.

In many instances a well-structured Canvas content page can offer the best experience for your students, providing them the flexibility to access the content from various devices and without need for additional software.

PDF’s

Documents can be shared in many formats, but the most common (by far) is PDF. Documents usually originate in Word or Google format, or PowerPoint presentation files. Uploading these files to your Canvas course to share with students requires them to have the necessary software to open these formats. Students must also download the files and then open locally on their computer and may need access to a printer if they require a hard copy.

Providing documents in PDF format can eliminate some of the software restrictions. Students can download the free Adobe Reader (or use another PDF viewer available with their operating system) to access the PDF course materials. In most cases, the document will look exactly the same as when you designed it (assuming you have exported it properly). For the syllabus or other important course documents a printable PDF can be an valuable resource.

Document Structure

It’s very important that you use the correct workflow for exporting your documents. This usually means using the “export to PDF” or “save as PDF” options in your text editor to create your document. Never use the “Print to PDF” option! The resulting PDF will be an image based file that will have none of the underlying structural elements that are very important to students who use assistive technology, or for anyone who needs to modify the document for optimal viewing.

This underlying structure is equally important when sharing PDF’s from online journals or scanned from physical textbooks. Unfortunately many journals are still not providing fully accessible documents. Scanned documents are often inherently inaccessible (image-based) and very difficult to use by all learners. In both cases students can face serious digital barriers to access if they are using assistive technology. The Ally accessibility checker included in Canvas will scan all documents in your course and provide an accessibility score and guidance for how to make improvements, if needed.

A Van Pelt and Opie librarian can help you locate accessible course resources from journals and publications and the Jackson Center for Teaching and Learning is available to consult about best options for creating and sharing course materials with your students in Canvas.

Resources

Creating Accessible Documents
Creating Accessible Presentations


April

Each workshop consists of two consecutive presentations followed by 10 minutes of discussion.

Spring UPTLC virtual presentation 3, April 13, 2021 at 3:30 PM

Returning Students to the Classroom Post Concussion by Co-Presenters: Joseph D. Susi II, LSSU School of Kinesiology and Erin Young, LSSU Student
Abstract: 
Concussion incidence varies among sports with the NCAA illustrating football with the highest overall portion of collegiate athletic concussions at 37% (2013-2014 NCAA Sports Medicine Handbook).  However, a 2019 study on the incidence of concussion among US undergraduates depicts that the overall concussion rate of sport related concussion was lower than non-sport-related concussion.  Athletes have Return to Play Guidelines and professionals to assist them along the way.  What provisions are available for students and student-athletes in returning to the classroom or “Return to Learn?”  Our talk is based on a class project from fall 2019 and will  examine concussions, identify a “Return to Learn” Team and present guidelines for a “Return to Learn” protocol for students who have experienced a concussion.   

“This Film Made Me Want to Pull My Hair Out!” The Value of Student Diaries for Course Assessment by H. Russell Searight, School of Behavioral Sciences
Abstract:
 Describes a faculty-student collaboration that provides meaningful course assessment information highlighting student reflections on course content. The presentation describes how the use of student dairies can provide a deeper understanding of the impact of a course.  

The subjective impact of a college course on students’ knowledge, critical thinking and ethical development is difficult to assess with standardized quantitative ratings or summative end-of-semester written comments. In particular, when teaching a new class with non-traditional pedagogy, such as the Honors Course, “Medical Ethics and Film,” students’ subjective experiences can provide valuable information for the instructor. Film, as an affectively-evocative narrative, may produce strong emotional reactions which can aid or hinder students’ understanding of course content. Students in “Medical Ethics and Film” were asked to keep a diary in which they recorded their reactions and ethical analyses for each week’s movie. The diary method is useful in providing educators with useful insight into how the class actually impacted students’ knowledge, critical thinking, and personal development and can be a form of communication between teachers and learners. To optimize the pedagogical value of personal course diaries, students should be able to write about their experiences in a reflective manner and experience openness and trust in how their writing will be used. Students were informed at the outset of the course that their reflections and observations through their diaries would be used in a qualitative research paper which they would co-author. However, students were assured that their diary entries would be described without identifying information. At the end of the course, an article, co-authored by the students and instructor was submitted and subsequently accepted for publication

To register for other UPTLC presentations, use these links:

Tuesday, February 16 at 3:30 PM 

Tuesday, March 16 at 3:30 PM 

March

Spring UPTLC virtual presentation 2,

Tuesday March 16, 2021 at 3:30 PM via zoom
Each workshop consists of two consecutive presentations followed by 10 minutes of discussion.

From Classroom to Resume – Skills that Count by Geralyn Narkiewicz, LSSU Career Services
Abstract: 
It is not unusual to read business reports or survey results that indicate recent college graduates are lacking in key employability skills. What skills are employers looking for? Are students truly lacking these skills or are they just not connecting the dots between their learning and the skills they are developing? In this presentation, we will discuss the 8 career competencies identified by the National Association of Colleges and Employers. Participants will share and discuss ideas for increasing student awareness and understanding of the skills they are developing through their college coursework.

WRITE-D: Applying Write-on-Site to Graduate Work in the Disciplines by Co-presenters: Andrew Fiss, MTU Humanities Department; Sarah Isaacson, Will Cantrell, and Pushpalatha Muthy, MTU Graduate School
Abstract:
 While writing is a necessity in graduate programs throughout the disciplines, many find it difficult to address. At this session, we will introduce “write-in-department” groups: groups that provide a regular space and time for writing together within a department. Acknowledging the uses of such groups in undergraduate instruction, write-on-site groups have been implemented successfully at the graduate level at Michigan Technological University. Session leaders will discuss the application of this model to groups in Physics, Chemistry, Civil and Environmental Engineering, Biomedical Engineering, and Biological Sciences. Attendees will be asked to participate in a short exercise of writing and reflection as a way of exploring the benefits of this approach. Graduate write-in-department groups provide an opportunity for discipline-specific discussions of writing over the duration of the graduate program. In contrast to the “dissertation boot camp” model, the WRITE-D model engages students with disciplinary writing throughout. As needed, faculty share knowledge about rules, norms, and processes, especially having to do with publications, proposals, and fellowships in the field. More broadly, write-in-department groups provide a social network for working through writing — one located within the department, with involvement of department faculty and facilitated by graduate student peers. Overall, the WRITE-D program uses graduate write-in-department groups as a way to help students generate better writing, more effectively.

To register for other UPTLC presentations, use these links:

Tuesday, February 16 at 3:30 PM 

Tuesday, April 13 at 3:30 PM

CTL Instructional Award: Large classroom teaching to Kette Thomas

Tuesdays, March 30. 2021 at 3:30PM

The 2020-2021 CTL instructional Award for large class teaching will be presented via a zoom session on. Dr Thomas will give a presentation titled Empathic Instruction: The Power and Limits of Making it Personal. To register for this event, please use this link.

Abstract: Professionalism suggests disciplined, objective, and impersonal communication between the vendor and his client. Conventional business practitioners might frame their organizations around bureaucratic ideals, delivering their products and services mechanically and “without prejudice.” This presents the appearance of equitable distribution and management of goods and services. A University setting, however, is more complicated than a conventional business model automatizing its products. University educators require an approach that acknowledges the very personal nature of learning. Indeed, to open yourself up to education is to make yourself vulnerable. This vulnerability is not weakness but, rather, a tool that can guide the learner to new areas of knowledge acquisition. But inappropriately applied, vulnerability in the classroom can also act as an impediment. Educators are, therefore, charged with negotiating the power and limits of intellectual vulnerability. In this lecture, we will look at the uses of empathy during instruction and how they can both accentuate and obstruct the learning process.   

February

Each workshop consists of two consecutive presentations followed by 10 minutes of discussion.

Spring UPTLC virtual presentation 1, February 16, 2021 at 3:30 PM

Our Evolving Co-Advising Model by Jillena Rose, Bay College
Abstract: This bridge in Viet Nam cleverly demonstrates the obvious: Bridges are held up by more than one support. Students, also, need the support and advice of more than one person. It takes more than one advisor to guide a student through college.
Bay College has recently implemented a Co-Advising Model of support for its students. From the moment they are admitted, students receive a co-advisor in addition to their faculty advisor–a guide to help students acclimate to the world of college and empower them to succeed by pointing them toward the people and services that history teaches us will help them succeed. Individually and as a group we also seek to identify and break down barriers individual students encounter to success which might be as “simple” as speaking to an instructor about missed work, as personal as finding child care, and as practical as making an academic plan for future semesters.
How do Co-Advisors do all of that? How do they work with Academic Advisors? Those are great questions and we’re still figuring them out. Presenters will share what we’re using, including some of the data tools we use in the background to help us make more intentional choices when it comes to communication, planning and outreach.
The goals of this session are to describe the Co-advising model and talk about its’ success at Bay so far. We also look forward to participants sharing successful tips for connecting with and supporting students on their campuses. 

Building a Bridge to Information Literacy with Michigan eLibrary Content by Liz Breed, Michigan eLibrary Coordinator; Library of Michigan | Michigan Department of Education
Abstract: Today’s students struggle with developing sound information literacy skills. Project Information Literacy stats indicate 92% of college students use search engines for course research. Students’ reliance on Google and social media combined with our ever-changing information landscape makes building strong information literacy skills increasingly more challenging. At the post-secondary level, there are several supports available including the Association for College and Research Libraries (ACRL) Information Literacy Framework and the eResources available in the Michigan eLibrary (MeL). Combined, these tools offer educators a way to weave information literacy concepts into assignments to support students as consumers and creators of information and their development of critical thinking and problem solving skills. This session will review the ACRL Information Literacy framework and demonstrate how assignments can be paired with MeL content to support the application of the information literacy frames in instruction.

To register for other upcoming UPTLC presentations, use these links:

Tuesday, March 16 at 3:30 PM 

Tuesday, April 13 at 3:30 PM 

In-Class Polling

Interested in polling your classes? Have you heard the terms iClicker Classic, iClicker Cloud and REEF? You may be wondering what the differences are between these terms and where to start with in-class polling. Let’s begin by defining these terms…

Photo courtesy of Pexels

iClicker Cloud, REEF and iClicker Classic

iClicker Cloud is a platform that allows an instructor to run synchronous polling, quizzing and attendance activities in class. iClicker Cloud can be downloaded to a Windows or Mac system. REEF is the mobile/website application students use to participate in the polling, quizzes and attendance. To connect with the course, students run the REEF app from a mobile device, tablet or laptop. REEF is available to students for a small one-time subscription fee.  iClicker Classic is classroom-based polling software designed for use with physical clicker remotes, but can also support student responses from the REEF app if configured properly. 

Getting Started with iClicker Cloud for Remote Instruction

Instructors who want to use iClicker Cloud for Remote Instruction, can establish a free account at iClicker.com. Setting up your account will include setting up the names and details of your courses so that students can easily find them on REEF app. Once your account and courses are established, you can download the iClicker Cloud desktop software and you are ready to start polling. Want to run some practice polling sessions before you go live in your classes? Your iClicker account allows you access to a (free, limited term)student REEF account, so you can practice answering your own polling questions as a student…so let’s get started! Here is a great QuickStart Guide: Using iClicker for Remote Instruction that outlines the details.

Incorporating REEF into an iClicker Classic class session.

Are you currently using iClicker Classic polling software (designed for use with physical clicker remotes) in your face-to-face classes but want to allow students to be able to respond to your polling using their smartphone, tablets or laptops? You can do this by simply enabling iClicker REEF in your iClicker Classic software.

Additional Resources

For additional resources on student polling, be sure to visit the Jackson Center for Teaching and Learning Instructional Resources webpage

Need Help?

Contact the elearning support team (elearning@mtu.edu) in the Jackson Center for Teaching and Learning if you have questions about Canvas, Huskycast, Zoom or other educational technology tools.

A New Editor in Canvas

You’ve probably noticed that things look a little different in the Canvas Rich Content Editor (RCE) these days. The updated editor became available in all Michigan Tech Canvas courses at the beginning of the Spring 2021 semester. We’ve seen several support requests come into the CTL recently asking how to do things like insert course links, images, media, and documents in the new editor. Our knowledge base article provides a good overview of changes and Canvas offers many guides about specific functionality as well. Below I will outline a few common pain points we have been seeing since the change to the new RCE.

Links tool in Canvas Rich Content Editor

Links

In the new RCE there are separate tools for inserting content. These tools are grouped in a section of the toolbar and are also available from the Insert menu at the top of the RCE interface. The process to link to other course content has changed. When you select the Course Links option a sidebar will open allowing you to browse and select where you want to link in your course. You can also insert external links (and add descriptive link text) from this tool.

Image tool in Canvas Rich Content Editor

Images

The image tool lets you insert images via upload, or from your course files directory. With the upload option you can drag/drop or browse to a file on your computer. You can also link to a url from a photo hosting service. To support accessibility make sure to include alternative text to any images that convey important meaning, or click the available box to tag the image as decorative only. You can also insert files already present in your course files directory or from your Canvas user files (global files attached to your Canvas profile).

Media

The upload/record media tool lets you insert media files (short audio/video clips) by dragging them into the upload box or browsing to a media file on your desktop. The record media option allows you to record media on the fly using your available camera and microphone devices. Existing media files in your course or Canvas account can also be inserted. Any video content that is stored in your course

Huskycast embed tool in Canvas Rich Content Editor

Huskycast folder can be inserted by selecting the green Huskycast icon. When you click this tool you can browse and select the video session in Huskycast that you want to insert. Remember Huskycast video content is not stored in your Canvas course files area so it does not count against your course file storage quota. We highly recommend that you store all video content in Huskycast and not in your Canvas course files area.

Document insert tool in Canvas Rich Content Editor

Documents

Insert links to existing documents in your course files or drag and drop new document files from your computer into the upload window.

Try it Out

Yes, there are some significant changes in the new Canvas RCE, but once you update your workflows you should benefit from the more robust editing features available. Let us know if we can help.

Resources

Canvas: Rich Content Editor Guides
MTU: New Rich Content Editor